Written by Greg Gimlick Helicopters How-to As seen in the Fall 2017 issue of Park Pilot.
>> Don’t panic, don’t toss the helicopter in the trash, and don’t get discouraged! If you’re going to fly, you’re going to crash. How you react to the crash is as important as anything else you do in the hobby. My friend, Jim Ryan, is fond of saying, “The nice thing about fixing a crashed helicopter is [that] it’s a brand-new one when you’re done.” There isn’t any covering to repair—just bolt up some new mechanics. A common break—The photo below shows something that is very common—a stripped section of the main rotor-drive gear. The damage is at the top of the photo and, although the heli will still fly in this condition, it won’t get better. It sounds terrible and will eventually get worse.

The main gear for the Blade 250 CFX has a stripped section at the top.
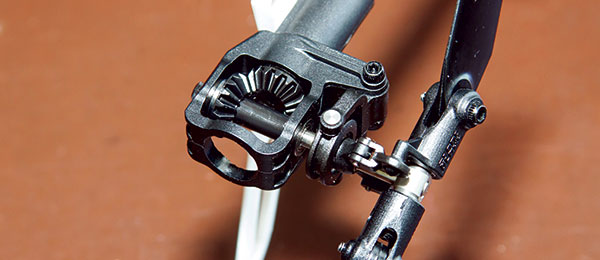
The good news is that it’s a 5-minute job to replace this gear. Some companies make after-market gears of tougher material, but I haven’t changed to them because this is a simple break and nothing else gets damaged. Think of it as a sacrificial part in a bigger chain of more expensive things. How did it happen? The short answer is, “Who cares?” It usually happens on FBL (flybarless) machines when we gingerly try to take off and dither around lightly on the skids too long. We end up dumping it on its side, striking terra firma with the main rotor blade. FBL units don’t like to wobble around lightly on the skids, so they try to correct it. Take off with a little gusto and this won’t happen as often. How to fix it: The photos show my Blade 250 CFX and 230S helicopters (bladehelis.com), but most are quite similar. Don’t start popping off parts before you study your machine to see what really needs to happen. In my case, it was just one bolt and three linkages. The bolt going through the gear and main drive shaft is removed, along with the three ball links from the servos at the swashplate. Once that’s done, simply slide the whole head assembly and the shaft up until you can slide the main gear out. Be watchful of any spacers that might be there. On the 250 CFX, you can see a brass spacer above the gear that needs to be put back in with the new gear.

Both Blade machines have three ball links at the swashplate that need to be removed before the head assembly can slide up to replace the gear. Don’t remove more parts than necessary.
After you slide the new gear in place and replace any spacers, slide the shaft assembly down until the top stop collar (that you, hopefully, left in place) rests where it’s supposed to. At that point, the bolt should slide right through the gear and shaft. Because you didn’t move the motor, there shouldn’t be any need to adjust the gear lash. Snap the linkages back on the swashplate and you should be set to go.

The side of the 250 CFX shows how accessible the gear is to replace. There is one bolt through the shaft, but be sure to grab that spacer when it comes out.
Most helicopters are similar to these Blade machines. You will find some that have two stop collars. If that is the case, loosen the lower collar so that the shaft can slide upward. Some will require you to loosen the motor to allow room for the gear to come out. If that’s the case, check the gear lash before disassembly so that you can replicate it when you put the new one in. The principle is the same, though. Don’t remove more than necessary and you won’t have to do a lot of setup tweaks upon completion.

The Blade 230S uses the same main gear and comes out as easily.
Tracking tip: I can’t claim this as my idea, but I saw it done years ago at the field and it works well in a pinch. To quickly check the tracking of the blades, set your collective to neutral pitch, rotate the blade grips so that they are 90° to the frame, and rotate the blades backward. When the blades are next to each other, you can see if one is going to be higher than the other. In this position, they should be as close to the same height as possible. This is a field check, and “close enough for government work” if you need to make a small adjustment. In the Army, we referred to this type of action as a “field expedient repair.”

With the pitch at neutral, the blade grips perpendicular to the frame, and the blades rotated back, the tips should be level with each other. This is a quick field check for tracking adjustments.
Learning how to easily deal with damage will enhance your helicopter enjoyment. Don’t make it a bigger job than necessary. Study it before disassembly. Grab your phone and take photos of it as you take it apart. This helps jog your memory when you’re staring at a bunch of parts on the table. -Greg Gimlick maelectrics@gimlick
Article: