Written by Lucas Weakley New Technology As seen in the Spring 2020 issue of Park Pilot
>> There are many ways to hinge a control surface. Those who build balsa models have a choice of hinge pins, nylon hinges (that look like baby-proof door hinges), and CA hinge fabric. These solutions rely on balsa’s superior stiffness by applying all control surface flight forces through the tiny surface area of balsa to which these hinges are attached. For foam aircraft, these three hinging solutions, unfortunately, often pull out of foam because it has such low surface shear. Flexible foams such as EPP (expanded polypropylene) can support control surfaces made by routing out material and leaving a thin hinge of the foam. Unfortunately, this technique doesn’t work with semirigid foams such as Depron, XPS (extruded polystyrene), Readi-Board, and insulation foam. The thin foam left by cutting a shallow groove would break after being bent only a few times. For these reasons, taped hinges are most often used when building and repairing foam models. There are three taped hinges that I want to mention. I’ll also discuss what tapes are best to use and share my techniques on making the best hinges. The simplest taped hinge is the single bevel. The control surface edge to be hinged is usually beveled, and the attaching structure (the wing, vertical, or horizontal stabilizers) remains at 90°. Tape is applied flush with the flat face of both surfaces then folded into the beveled joint, making sure the two sticky sides touch at the joint to prevent the tape from popping off. This hinge leaves one side completely flush with the supporting structure, making it more aesthetic and nearly invisible from the top side. The hinge motion is asymmetric because the pivot is offset from the center. This has negligible aerodynamic effects but makes servo attachment tricky. Regardless of servos, the single-bevel hinge is capable of pivoting 180° in one direction and whatever angle the bevel is cut at in the other direction. I usually cut mine to 60°. If more range is needed, use a double-bevel hinge. This is similar to a single bevel in terms of aesthetics and taping, but it differs by cutting a bevel into both sides of the hinge. The bevels need to be shallower to maintain structural rigidity, but even with both cut at 45°, this increases the surface throw to 180° and -90°.

Here’s what the single-bevel hinge looks like. Separate pieces of tape on either side touch at the pivot point.
The single-bevel and double-bevel taped hinges are also ideal for paper-backed foam boards. Instead of cutting the control surface off, the hinge can be scored, leaving paper intact on one side. After adding the bevel, the surface will flex freely on its paper hinge. The paper adhesive, however, won’t last long, so it’s still important to add some tape on the bevel side to keep the paper from delaminating.

The double-bevel hinge is similar to the single-bevel hinge, with tape on either side that touches at the pivot point but offers a greater range of motion.
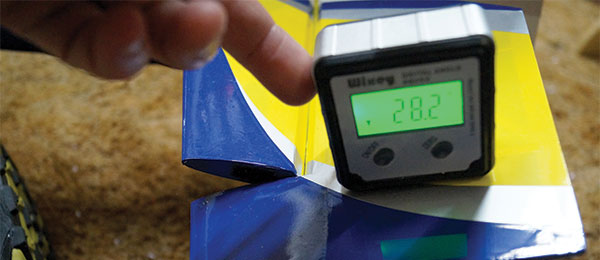
My favorite way to bevel foam comes from Dave at RCPowers (rcpowers.com). On the top side of the foam, lay a straightedge flush against the edge that you want to bevel. Take a hobby knife and tilt it inward toward the foam at the angle that you want the bevel, resting the tip on the cutting mat and the blade’s side on the straightedge. Slide the knife through the foam, holding the angle as constant as possible. This method is much better than freehanding the bevel! By the way, if you’re wondering how to get the tape into the beveled joint, simply fold the control surface up and over the attaching structure until the bevel is parallel with the cut foam face. Lay it over the tape and press it in firmly, making sure to keep the edge of the control surface parallel to the attaching foam while you work. Using thinner or more flexible tape helps a lot. I tend to use standard packing tape and fiber-reinforced packing tape for my hinges. Heavy-duty packing tape is often too thick and interferes with hinge motion. One last tip: Many people have recommended taping hinges with small sections of tape, as opposed to one continuous piece. That way, if the tape tears, you only lose a small section instead of the whole control surface. With all of my airplanes, I’ve never had tape tear, especially fiber-reinforced tape. The rigidity added by capturing the entire hinge edge is more desirable to me. The final way that I often cut hinges is with centered bevels. This requires beveling all four edges on the hinge surface, usually to 45°. Doing this makes the hinge pivot centered within the foam’s thickness. This offers great aerodynamic constancy because deflections are symmetrical (perfect for rudder surfaces), but the bevels are seen from both sides, so it doesn’t look as nice as the other hinges. This hinge is also hard to cut into a single sheet of foam.

Notice that the center-beveled hinge is made on two sheets of foam instead of one. Again, separate pieces of tape on either side touch at the pivot point.
I often use the center-beveled hinge on larger airplanes where I can stack two sheets of foam together, giving each a single bevel. The center bevel can be taped the same way as the previous hinges, adding tape to each side and pressing it into the bevel. However, without a common parallel surface such as what the single- and double-beveled hinges have, the center-beveled control surface can drift out of place when moved by a servo.

This is an alternative taping method for the center-beveled tape hinge. The top left shows how the tape overlaps at the pivot. The top right shows how the tape weaves the hinge together.
A better way would be to capture the hinge in place by having the tape pass through the joint. This over/under taping is done by taking two small pieces of tape, flipping one, and overlapping the sticky sides by approximately 1/4 inch. If you’re hinging a rudder, one sticky side is attached to the vertical stabilizer then the not-sticky joint is bent over the pivot and taped to the opposite side of the rudder. A minimum of two of these tapes woven opposite and close to each other capture the surface and create a sturdy hinge. Although we might have limited hinge options as foam modelers, there is still a lot of variety in the techniques used when making model aircraft. Varying the tapes used and the bevels cut on control surfaces can either make an airplane fly more consistently, look more scalelike, or increase control authority. I hope something in this column is useful to you and maybe you can use it on a future airplane!