Written by Ashley Rauen A space-saving simultaneous battery charger Product review As seen in the Summer 2018 issue of Park Pilot.
Specifications:
Type: Battery balance charger Charge current: 2 x 0.1 to 7.0 amps Discharge rate: 0.1 to 1.0 amp Circuit power: 2 x 80 watts Current drain balancing: 300 mAh per cell Input: 11.0 to 18.0 volts DC; 100 to 240 volts AC Weight: 1.8 pounds Price: $99.99 Info: venompower.comFeatures:
>> Dual charge circuitry >> Multi-chemistry charging >> Lithium cell-voltage monitoring >> Multiple charging leads including: Alligator, Deans, EC3, EC5, JST, Receiver, Tamiya, and XT60 >> Lithium cell count: one to six cells >> NiCd/NiMH cell count: one to 15 cells >> Lead acid battery voltage: two to 20 volts >> LCD display >> Detailed operating manualProduct review
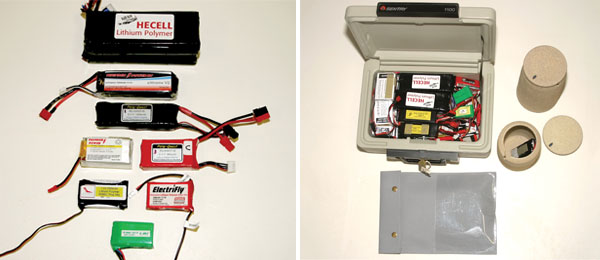
>> As your model hangar grows, no doubt so does your battery collection. I can guess that not all of your batteries are the same type or size—mine certainly aren’t. The Pro Duo Charger from Venom is a great solution for charging all types of batteries, and you can charge up to two at a time. Right out of the box, the Pro Duo is nearly ready to go. You just need to plug it in. The box contents include the charger, eight different charging leads, two balance boards, AC and DC power cables, and an operating manual. I loved the look of this charger right away. It is lightweight and much smaller than I expected. The vertical stance means that it saves a lot of space, not only on your workbench, but when packing the car and heading to your local flying field. I charge my flight batteries at work and this charger is fairly inconspicuous on my desk. Another great feature of this charger is that its power is built in and there is no need for a separate power adapter. The back of the charger offers ports for an AC and a DC power cable. The back of the charger also has a place for temperature sensor plugs, which are available for purchase separately. The Venom Pro Duo supports the charging of most common battery chemistries: LiPo, Li-Ion, LiFe, LiHV, NiCd, NiMH, and Pb (lead acid). It is also set up with two complete charging circuits, each with a dedicated 80-watt integrated power supply. This means two batteries can charge simultaneously without diluting your amp rate. Each battery channel also has its own fan that turns on during charging. The LCD display is clear and easy to read. All menu navigation is done with five buttons set on the front of the charger. The channels are distinguished by a red light on either the left (channel one) or right (channel two), so you can quickly tell which channel you are programming. You can switch between channels with the push of a button.
The extra-long balance cords allow you to place your batteries in LiPo sacks for safe charging.
To get started, plug your charger into the wall and the LCD display will light up. Plug in the balancing connectors for each channel. The battery I first used with this charger had an XT60 connector, so I located the appropriate lead and plugged that into channel one—red in red and black in black. Using the buttons on the charger, I can set a program for the type of battery that I have. In this case, it’s a 4S LiPo. The display will read “User Set” and by pushing the enter button, I can select my battery type. Mine is already set to LiPo and the appropriate cell voltage (3.7 volts), so I don’t need to change anything here. If you are using a different type of battery, you can cycle between the types by using the two center buttons on the charger that are labeled as “dec” and “inc,” for decrease and increase. The next screen allows you to set up a check time for your batteries. This check time is programmed to allow the charger a certain amount of time (in minutes) to automatically check and detect the type of battery you have set it to charge. If the charger cannot determine the battery type in this timeframe, it will power down and the battery will not be charged. Advancing to the next screen lets you set the NiMH or NiCd sensitivity, if applicable. The following screen allows you to set the safety temperature cutoff if you have the temperature sensors connected. Other options through this menu include waste time, safety timer, capacity cutoff, keep beep/buzzer (turns the sound on or off), and input power low cutoff. Each option can be set up with the decrease and increase buttons on the charger’s face. Because “waste time” might raise some eyebrows, I should explain that the setting will insert a time delay to occur after each charge and discharge process to allow a battery adequate time to cool down.

During charging, the LCD display shows amps, battery voltage, and charge duration. Pushing the increase button allows you to view the voltage of each individual cell.
Now your charger should be programmed, and you will be taken back to the screen that shows your battery type and voltage. Press the select button, which takes you to Program Select. Here you will make sure your setting is for the battery that you need to charge. The first option will ask you to set up the amps that you want to charge your battery at and the voltage of your battery. After that’s set, push the enter button again and hold it until you hear a beep. The Pro Duo will then check your battery, determine the number of cells it has, and ask you to confirm that it is correct. Press enter and the charging begins. The display will show your amps, current battery voltage, and how long you’ve been charging the battery. Hitting the increase button takes you to a new screen, where you can view the voltage of each individual cell. Because this is a balance charger, your voltage should be pretty much even across all cells. When charging is complete, the Pro Duo beeps to let you know it’s done. Disconnect your batteries, grab your models, and head out to the flying field. That’s all there is to it. This is a nice dual charger. The best part about the Venom Pro Duo is how easy it is to use. You don’t have to be a battery chemist to ensure that you are safely charging any batteries you might have collected during your years in model aviation. -Ashley Rauen [email protected]
Article: