

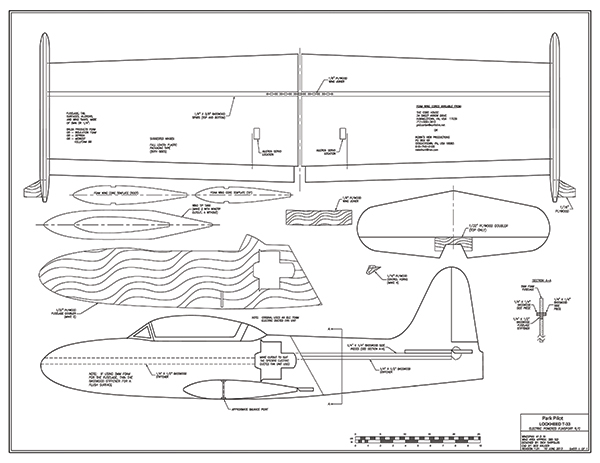
Designed by Dick Sarpolus. Free plans from Summer 2014 Park Pilot.
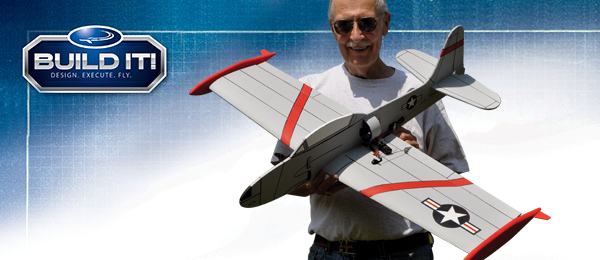
Military aircraft are popular modeling subjects. If you are interested in trying scratch-building and if you’d like a jet fighter model, you might start with this Lockheed T-33. Or if you already enjoy building, this is an interesting EDF (electric ducted-fan) jet project for you. Sheet foam airframes can provide a lot of flying fun at a low cost and they’re easy to build. I consider this one a hybrid construction, rather than just a flat plate sheet-foam wing. It has a hot-wire-cut foam wing with a thick, symmetrical airfoil along with sheet foam for the rest of the parts. The wing on this model provides better windy weather flying capability and I like the way it handles, making it feel more like a larger airplane. With a decent paint job and some trim work, it also has scale appeal. I’m amazed at the power, low cost, and ease of use of the newer EDF units. They make it possible for sport fliers to enjoy some fun and practical jet flying.
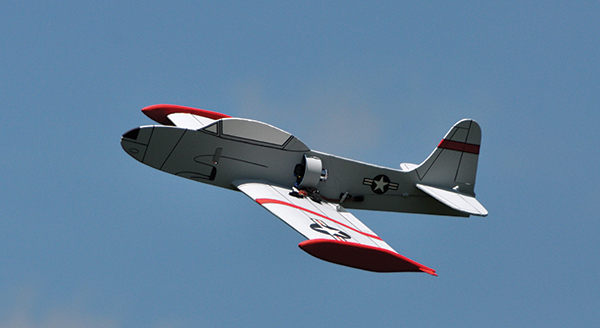
The T-33 can be flown quite fast and looks best when performing like a jet fighter with large radius, smooth turns.
The wing panels butt up against the fuselage sides, held together with a plywood joiner going through a slot in the fuselage. A hole was cut in the profile fuselage to mount the EDF unit.
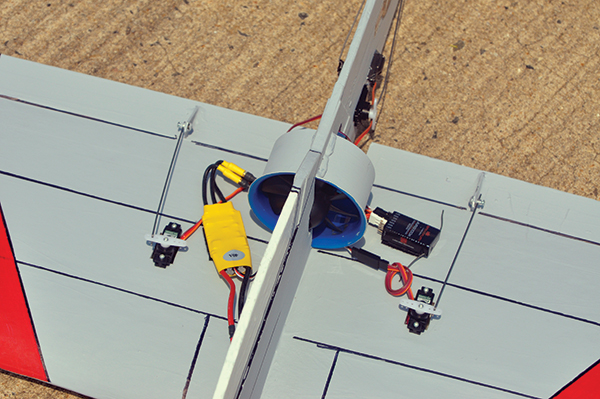
Although the EDF unit is simply inserted in the profile fuselage, it doesn’t seem to bother the airflow and thrust. The model flies with plenty of power. The EDF unit is held in place with adhesive from a hot glue gun.
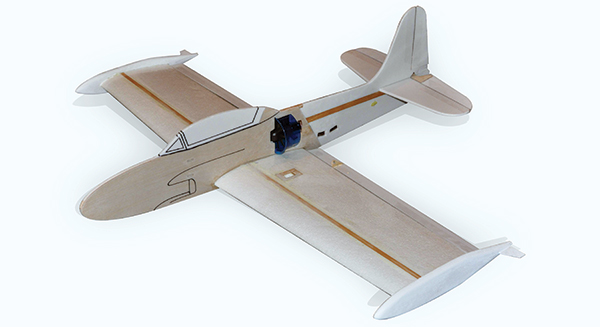
The Lockheed T-33 was our country’s first jet trainer. This T-33 model is constructed using sheet foam for the profile fuselage, reinforced with 1/32 plywood doublers and a 1/4 x 3/8 basswood stiffener. An added 1/4 square strip of basswood glued on each side of that stiffener will help even more. A hole is cut through the fuselage for the EDF unit. After the airplane is finished and detailed, the EDF unit is placed in its space and secured with a few dabs of glue from a hot glue gun. Any of the commonly available sheet foam materials are suitable, such as Depron, Midwest Cellfoam 88, or BP Hobbies construction foam. If you don’t cut your own foam wings, any of the commercial foam wing cutters can do it for you. Phil Cartier’s The Core House (home.earthlink.net/~philcartier) offers a box of four sets of computer-cut cores at a good price. I cut up a set of plans for paper templates, trace the patterns with a ballpoint pen, and cut out the parts with a sharp scalpel-type modeling knife. I use 5- and 15-minute epoxy for most of my building; I’m always in a hurry. Epoxy is fine for most sheet foams, but the foam with thin, plastic film sheeting will need pinholes punched through the skin so the epoxy can get to the foam. A friend of mine builds these airplanes with foam-friendly CA glue, and his aircraft always turn out lighter than mine. The standard foam wing cores sold by The Core House are 24 inches long. They were trimmed off at the tips for the T-33. I cut the slot into the wing cores for the 1/8-inch plywood wing panel joiner. Basswood spars of 1/8 x 3/8 were epoxied into the foam cores. The two wing panels butt up against the fuselage sides, with the 1/8 plywood joiner going through a slot in the fuselage and into the wing cores between the upper and lower spars. The tip tanks are made of three layers of sheet foam sanded to a rounded-off shape. In the wing panels, I like to glue a piece of 1/8 plywood cut with a hole to accept the servo, which is held in place with two mounting screws. Two aileron servos are used in the top wing surface to keep the bottom of the airplane clean for easy landings and ground takeoffs. I hinged the ailerons, elevator, and rudder with 2-inch-wide clear plastic packing tape in the usual foamie manner. The LEs (leading edges) of the ailerons and the control surfaces were cut and sanded at an angle, and the tape was applied to the upper surfaces first. Then, with the control surfaces folded upward, the tape was applied to the bottom, pushing it into the hinge gap and sealing it to both edges. This provides free movement and a strong, completely sealed hinge gap. I covered the foam wing panels with a low-temperature iron-on film to protect the foam and make an easy-to-paint surface. I like the SLC covering material sold by The Core House. It’s light and accepts most kinds of paint. The servos were mounted by cutting holes in the foam so the servo is push-fitted in and secured in place with glue from a hot glue gun. Slots are cut into the control surfaces for the 1/16 plywood control horns, and they are epoxied in place. Pushrods are made from .047 wire with a Z-bend on one end and a DuBro Mini E/Z link on the other end. Short pieces of nylon tubing are hot glued to the fuselage sides to keep the pushrods from flexing. The ELE 70mm EDF unit from BP Hobbies comes with the motor installed and just needs the connectors soldered to the motor leads. The ESC and the receiver are mounted on the top surfaces of the wing with hook-and-loop tape. I mounted the LiPo battery on the side of the fuselage with hook-and-loop tape, and slots were cut through the fuselage for a hook-and-loop strap around the battery for security. This foam model is easy to paint with water-based acrylic craft paint sprayed on with a low-cost airbrush or small paint sprayer. Even when brushed on with a foam brush, the paint provides a good finish. I use Sharpie felt-tip marker pens to add scale detailing. Stick-on vinyl military insignias also work great. With the ample EDF power, it’s easy to hand launch the T-33 or take off from a short grass field. The airplane is fast and looks best when flown as a jet fighter with large radius, smooth turns. It is also aerobatic. This isn’t an accurate, super-detailed Scale project. It could be described as Cartoon Scale, but hey, it will provide a lot of jet fighter flying fun for not too much effort or cost.
 🏛️
🏛️Click here to download your free Lockheed T-33 Build It Plans.
Article:


