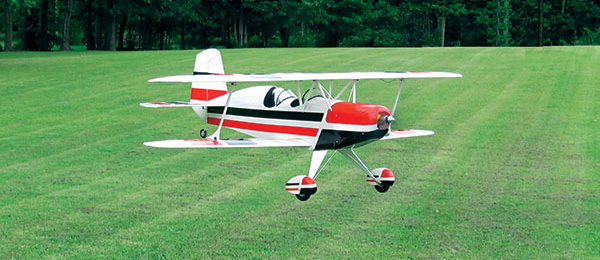
By Geoff Barber A fun-scale rendition of the Dream Classic Ultralight. Product review and flight video. Featured in the Winter 2015 Park Pilot.
Specifications
Type: Laser-cut kit Skill level: Beginner to intermediate Wingspan: 17.75 inches Length: 12.25 inches Weight: 1.4 ounces Price: $39 (kit only) Info: stevensaero.comFeatures
• Precision laser-cut parts • Full-size plans set • Photo-illustrated step-by-step instructions • Hardware package including pushrods, control horns, gear struts, profile pilot figure, tail skid, and solid-hub plastic wheelsProduct Review
As with any project, I start by reading the manual. Stevens AeroModel has left nothing to chance, and manual is one of the best I’ve ever seen! In addition to the instructions, there are two sheets of full-size plans, but the kit went together so well that I didn’t need to use them. Before building began, I laid out all of the sheets of balsa and light plywood, and sanded both sides with 220-grit sandpaper on a sanding block. This slightly thinned the sheets and removed any debris left from the laser cutting process. With all of the wood sanded, I started building the fuselage. All parts fit together so well that I was able to put almost all of the main pieces together before touching any of it with CA. When all of the parts were accounted for and in place, I used a few drops of thin CA glue to lock everything together. Adding the seat and motor mount came next, and all pieces were fit in place and then glued. Following the instructions (make sure to reread each step as you’re building), I added the main wing spar to the top of the fuselage and then it was time to make a decision. The kit includes enough pieces to build the Sweet Dream one of three ways: Civilian, German, or British. Because the folks at Stevens AeroModel sent patch packs of red and white AeroLITE covering and the Iron Cross decals, I went with the German version. I removed the full-flying rudder from its sheet, and the small laser-cut sections from the middle of the balsa rudder. From another sheet, I grabbed the laser-cut Iron Cross, and glued it into the Iron Cross-shaped cutout in the rudder. Installing the Iron Cross with the wood grain at a 90° angle to the surrounding wood provided rigidity. When the CA glue cured, I sanded a bevel into the lower section of the rudder, where it will later be secured to the fuselage. Moving on to the horizontal stabilizer and elevator, the stabilizer is simply a triangle-shaped piece of balsa, and the elevator is composed of three parts: light plywood center section and two outer pieces of balsa. The three pieces were glued together with a few drops of medium CA glue and left flat on the table to cure. When the CA was dry, I sanded a bevel into the elevator’s leading edge. The wings were built next. Each wing half consisted of seven pieces and a laser-cut balsa sheet to glue the pieces to. All of the pieces fit so well that building the wing was effortless, but you must pay close attention to the instructions so you get the three wing ribs in the correct locations. All three ribs are different, so proper placement is necessary! The most time-consuming part of the entire build was putting the dummy engine/motor cover together. There were several small pieces, and I had to cut some of the included aluminum tubing for the exhaust stacks. With the dummy engine assembled and glued, it was time to paint the fuselage and cover the wings and tail sections. I chose a simple flat-black spray paint for the fuselage, and applied three light coats to the wood. That was just enough paint to color the wood black without adding much weight. I dreaded covering the wings and tail surfaces—not because I don’t know how to cover, but I was uncertain of how well the AeroLITE covering would adhere to the thin balsa, and how much it would shrink. To my surprise, I was finished with the covering in little time. The AeroLITE stuck to the wood well, and shrank nicely following the instructions provided with the covering. The control horns were glued to the rudder and elevator, and the Sweet Dream was ready for final assembly!
The Sweet Dream consists of nine sheets of laser-cut balsa and light plywood, a few plastic and composite parts, and thin wire for pushrods.

After the individual components were built, it took approximately three hours to put the model together.

Everything has been painted and covered, and it’s time for final assembly.

Everything has been painted and covered, and it’s time for final assembly.
Following the instructions, the receiver/ESC/servo set was clipped into place and the pushrods were bent and installed. Each pushrod had three pieces—two pieces of thin wire and a section of heat-shrink tubing to hold the wires together. The motor/gearbox assembly was installed next, followed by the dummy engine. A short section of Velcro was added to the bottom of the motor box to hold the battery in place. The wheels and axle were installed, allowing extra room on the axle for the optional flying wires. (I’ll get to that part in a minute.) With the stabilizer and elevator on the table, I used a piece of clear tape to hinge the two parts together. To avoid adding weight, I cut the clear tape to a width of 1/4 inch. This was plenty of tape to attach the elevator to the stabilizer. With hinging done, I glued the stabilizer assembly to the fuselage. The fuselage had two tabs, and the stabilizer had two slots so they fit together perfectly, and the carbon-fiber stabilizer supports were glued in place! Another short section of tape held the flying rudder in place. It was time to set the pushrods. With my Spektrum transmitter turned on and the receiver pack powered up, I set the pushrod lengths and heated the shrink tubing. This locked the two pushrod sections together and gave great control to the rudder and elevator. It was time to add the wing halves! I slid each half into place on the main spar. I was happy with their fit, so I removed them, applied medium CA glue to all mating surfaces, and slid the wing halves in place for the final time. It was that easy! When the CA had cured, I tried to install the carbon-fiber wing supports. According to their location in the instructions, however, they were too short. I solved this by drilling two new holes in the fuselage about a 1/2 inch above the original location. I now had enough pushrod to make both supports work properly. I decided to add the optional rigging for the wing. This is where the extra length on the axle comes into play. With one end of the fishing line (not included with kit) tied to the axle, I threaded the line through the four laser-cut holes in each wing and through the rigging post I had glued to the top of the fuselage. Rigging takes some time and care, but it was definitely worth the extra effort! With that, building the Sweet Dream was complete. Time to go flying! A perfect night to fly the Sweet Dream came roughly three weeks after completing the model. We had been up to our eyeballs in rain and wind, but that was not so for the night of the maiden flight! I set the plane down on our textile runway and advanced the throttle. In only a few feet, the Sweet Dream was airborne and climbing out with ease. I pulled the throttle back to about half, and the micro airplane hung in the air as if on a string. Slow flight was relaxing and enjoyable. Lazy Figure Eights and flying a circuit over the runway was a lot of fun! I advanced the throttle to full, and the Sweet Dream picked up some speed and altitude. It likes to climb under full power, but a touch of down-elevator keeps the airplane flying level. Both high- and low-speed flight are fun! At approximately the 8-minute mark, I brought the airplane in for a landing. The Sweet Dream nearly landed itself! I lined up over the runway, pulled the throttle back to less than 1/4, and the micro aircraft settled in and landed. “That was fun,” I thought to myself, as I grabbed a handful of single-cell LiPo batteries. I flew it until I ran out of charged batteries! Stevens AeroModel is a US-based company that produces its products in this country. The Sweet Dream uses readily available, inexpensive electronics. I enjoyed flying this airplane, and cannot wait to fly it indoors now that winter is setting in.
Article: