


Written by Greg Gimlick
Get the tools and accessories to maintain your fleet
As seen in the Winter 2021 issue of Park Pilot
Whichever genre of park flyer you enjoy, whether airplanes, helicopters, sailplanes, or multirotors, you will eventually need some tools in your arsenal to keep things flying. One of the benefits of our park flyers is that they don’t require high-dollar, sophisticated support equipment. Whether you want to maintain your aircraft or do some building/repairing, you’ll benefit from accumulating a few handy items. I will review some “essential” items and also toss in a few “great to have” ones that can make some jobs easier.

This little foam-core airplane was built from two sheets of $1 foam board and a manila folder. A few basic tools are all that are needed to experiment and build small airplanes.
Material basics: What is your aircraft made of? That might sound silly, but the material will dictate what you need. Most of our foamies are EPP (expanded polypropylene), EPO (expanded polyolefin), EPS (expanded polystyrene), or Depron sheet. Many of us build with foam-core board that has a 3/16-inch polystyrene foam core that is laminated on both sides with heavy paper. If you check out Flite Test airplanes (flitetest.com), you’ll see how versatile foam can be. Of course, good, old balsa is still a favorite, and there are a lot of park flyers built that way.
Why do we care? Well, not all materials are happy with certain types of glue, and it’s important to know what will work with each type. EPP and EPO airplanes are common and CA (cyanoacrylate) glue compatible, but always check with a test piece first. Some foams that can handle CA can’t handle the accelerator spray, so be aware of that. CA also tends to make a stiff joint—that isn’t always the best option when we want our foam airplanes to be flexible to withstand less-than-perfect landings.
Look your aircraft over, see what materials are used in its construction, and shop accordingly for adhesives. I’ll cover more about that later. A lot of foamies have wood or carbon-fiber reinforcements that require glues that can adhere them to foam.
Adhesives: Because I mentioned this in the first section, let’s start with glue. This is probably the most important item in your toolkit, and one you’ll want to have at the field each time you go.
Field repairs are generally just that: enough of a repair to get you back into the air. At the same time, you want to try to get it as close to perfect as possible so that you don’t have to redo it back in the shop. Taking something apart that you hacked together in a hurry at the field can be a real chore. I’m going to focus primarily on foam adhesives because that is the predominant building material.

bSi makes a line of adhesives for every requirement. Here are the Form-Cure, threadlocker, and gel-style CA that go to the field with Greg Gimlick.

This 25-year-old, 40-inch Lazy Bee was nearly destroyed and later rebuilt. Balsa construction and a lot of patience were all it took to make it look better than new.
• CA is what many refer to as Super Glue—but not all are created equal. Always test on an inconspicuous place before committing to a big repair. bSi (Bob Smith Industries; bsi-inc.com) carries a wide variety of CA and some are designed to be foam compatible. Many foam-safe glues are also sold as “odorless.” bSi is one such formula and is proven to be foam safe.
I keep CA on hand for quick repairs. One formula that I’ve found to be handy is actually designed for aquarium repair. It’s not foam safe, so test it first if you don’t know whether your airplane is made from CA-compatible foam.
I like bSi IC-GEL, which is a CA paste. It’s the consistency of toothpaste, slow setting (approximately 30 seconds or so), and can be put on a vertical surface while you fit and adjust your repair. Always do a test before using CA that is not designed specifically for foam, and be aware that using accelerator might eat foam. In your toolkit, add foam-safe CA then other formulas as you get comfortable with them. Keep in mind that CA repairs are rigid and not flexible.
• Foam-Cure and Foam-Tac are two essential glues for your toolkit. Foam-Cure is from bSi and Foam-Tac is from Beacon Adhesives (beaconadhesives.com). Both perform in a similar fashion and cure quick enough for use at the field.
By applying some to surfaces, pressing the surfaces together, pulling them apart, then waiting for a few minutes before joining them, it acts like contact glue. Be sure to have the pieces positioned perfectly when you use it this way because there is little or no adjustment time. If you want some fudge time, just pull the surfaces apart for a few seconds, assemble them, and hold them while the glue cures.
Both of these glues are in my kit, but they are not exactly the same. Foam-Tac is a bit more flexible and can be used to reinforce foam hinges or even make a hinged edge. Foam-Cure is not as flexible, and hinging is not a good use of it. Both will work with all foams and other materials. One or both is a “must have.” A full cure takes a few hours, but both will cure well enough to accommodate field repairs and get you back in the air.
• Other glues: Other glues that are often helpful include epoxies, craft glues, and water-activated polyurethanes. bSi has a full line of epoxies in various timed formulas, but for most park flyers, the 5-minute version works best. It is a bit more flexible than longer formulas and won’t harm surfaces.
If you’re adding reinforcements with carbon fiber, Kevlar, or something similar, 5-minute epoxy is a great choice. Most hobby shops carry their own name brands. Most of them are bSi products that hobby shops order with their names on them, so you can trust the quality (the same with CA). Most craft stores carry Aleenes Tacky Glue packs, which give you multiple small bottles of various formulas. These all work well and are a good size to have on hand.
Water-activated polyurethanes, such as the original brown Gorilla Glue (gorillatough.com), are interesting glues and have their place in construction but are not necessarily the best for field use. It takes practice to adjust to the qualities of this type of glue and it should be used in the shop.
• Hot glue: There is a time and place for every glue, and hot glue can certainly be a great option. I prefer the high-temperature types and buy the clearest glue sticks that I can find. I have a rechargeable glue gun for field use and a higher-end AdTech Pro200 glue gun (adtechhotmelt.com) for shop use.
The Pro200 is a much hotter gun and the glue flows from it more smoothly. I use this mostly when building with foam-core board. Be aware that some foams will not tolerate the hottest glues. If you touch the hot metal nozzle of any of them to the foam, you’ll instantly melt the foam.
Some sort of hot glue gun is a must-have for me. It’s handy for popping a servo back into place and other situations at the field.
• Threadlocker: A small bottle of this will last a lifetime, but it’s important for motor mount screws and helicopter fittings.

These glues are always in the shop. Foam-Tac is a good alternative to Foam-Cure and a bit more flexible. Small tubes of craft glue and epoxy will come in handy and reduce waste.

Greg’s battery-powered Ryobi hot glue gun (ryobitools.com) goes to the field with him, but his go-to shop glue gun is the AdTech Pro200. It becomes very hot but is easy to handle.
The bottom line is to get foam-safe CA and either Foam-Tac or Foam-Cure glues for your kit. Don’t buy the biggest tube of any glue—the shelf life after it is opened will cause you to waste too much.
Cutting tools: Whether you’re building or repairing, you will need to cut stuff. Nothing fancy is required, but being sharp is a must.
Disposable, snap-off, box-cutting-type knives work well because they can be adjusted for how much blade you need, and the dull tips can be snapped off. X-Acto knives (xacto.com) work well, but because they don’t retract, care must be taken when transporting them to the field. The same goes for single-edge razor blades. Reaching into your toolbox and finding an open blade with your finger will ruin your day, so find a way to sheath it.
You’ll see I’ve included a fish fillet knife in my cutting tools. I love these knives because the blades are thin, very sharp, and they have a good handle, as well as a sheath.
Aside from knives, you’ll want some sort of saw. Find something with fine teeth that will cut carbon-fiber rods, wood sticks, etc. without tearing them up. Even a hacksaw blade can be used if you don’t want to buy Zona (zonatool.net) or X-Acto tools.

Cutting tools run the gamut. Greg keeps the retractable box cutter in his field box.
Tape: No tool kit is complete without tape! I always carry some Blenderm medical tape (3m.com) for hinge repairs. There are also commercial hinge tapes that resemble some regular office-supply tapes but are rebranded. I always have clear packing tape on hand for covering repairs or for reinforcing a field repair until I can get home and do a permanent fix. You might also consider some sort of double-sided tape for mounting accessories.

Tapes of various types are a must for repairs, hinging, etc.
Clamps, straightedges, sandpaper, and squares: Again, nothing fancy is required. Clamps can be anything from commercial clamps of various sizes to rubber bands, straps, and even tape—anything that will hold a piece in position while glue dries will work.
Squares and small levels come in handy when you’re gluing on wings and tail surfaces to ensure that they are straight and true. A measuring tape or even a piece of string can also be used to check the triangular dimensions of surfaces against one another.
If you’re cutting new pieces or foam-core board, you’ll need some sort of straightedge to guide the blade and ensure a good cut. I have some aluminum sanding bars that also double as straightedges when needed. Be careful when sanding foam—some take well to it and others shred. Always test on a scrap piece first.

An assortment of clamps lives in the shop for all sorts of tasks.
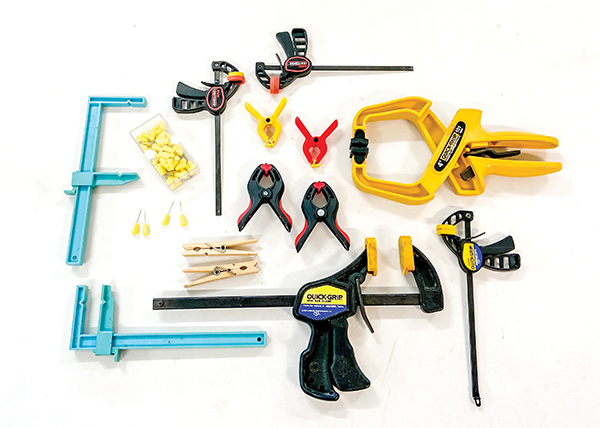
Squares, levels, jigs, and string all work well when setting up a new airplane or rebuilding..
Hand tools: This one is easy. Look at your aircraft and see what types of screws, bolts, etc. are used to hold it together. You don’t need a lot of tools; just the screwdrivers or wrenches that fit your particular aircraft.
Small Phillips-head and flat-tip screwdrivers cover 90% of our airplanes. Hex drivers or Allen wrenches can be handy for quick connectors, etc., along with motor-mount bolts. Needle-nose pliers and a set of forceps for grabbing screws that you drop down inside of a fuselage are handy too.

An assortment of clamps lives in the shop for all sorts of tasks.
Specialty tools: If you’re flying aircraft that use special hardware, you will need specialty tools to accommodate them. This can be anything from ball-link pliers and ball-link reamers to pitch gauges, etc.
This probably applies more to helicopter pilots than others, but look over your aircraft and see if there are things required beyond the normal screwdrivers, etc. Pitch gauges for heli pilots and tools to adjust linkages are handy for everyone.
Don’t ignore the need to balance your propellers/blades. If you damage one at the field, you need to balance the new one before installing it. Balancers can be as simple as a finger balancer or as complicated as some of the rotor blade balancers, but having something to check your propeller with is important. Off-balance propellers or blades can shake a machine apart or damage a repair.

Propeller and blade balancers are required for the shop, but not for your field box. Balance a spare propeller before you go to the field.

Spare parts should be kept in containers to keep them organized. Have a minimum selection for your field box and a more extensive selection in the shop. These tend to build themselves over time.

Tools for tightening, loosening, adjusting, etc. aren’t fancy, but the appropriate ones for your aircraft are a must. Carry the minimum needed in your field box.
Spare parts: I recommend carrying a few extra screws, bolts, linkages, clevises, etc. that are appropriate for whatever you’re flying. A small, plastic box with separate compartments keeps everything organized and easy to find. It can double as a shop box and field accessory.
If you’re a heli pilot, you might want extra gears, balls links, etc. to do a quick rebuild when things go wrong. The rest of us probably need a spare propeller, propeller adapter/saver, screws, servo horns, control rods, Velcro for the batteries, wing bolts, etc. Don’t go overboard—just have enough to get you back in the air from a minor incident. Save the major rebuilds for home.

Spare parts should be kept in containers to keep them organized. Have a minimum selection for your field box and a more extensive selection in the shop. These tend to build themselves over time.
Workshop extras: These items aren’t necessarily “required” but fall into the category of things I keep in the shop to make my life easier. Some are for building and others help with repairs, but none are expensive, and all come in handy once you have the basic toolkit established.
• Balsa stripper: This is a handy device if you’re going to build a lot of foam-core airplanes. It allows me to adjust the blade so that I can cut down to the bottom paper without cutting through it. The foam and top paper are then easily removed, leaving the bottom paper in place to cover the fold as it is glued.

Balsa strippers and angle cutters are nice to have when building with foam or wood.
• Angle cutter: This is used when I want to cut an exact angle in a piece of foam to establish a hinge. The tool is adjustable, and parts can be removed to allow for various-size materials. This is a true specialty item, but it comes in handy for accuracy. Homemade angle cutters can be made using blocks of wood and gluing/bolting blades to them.
• Fillers: After you do your field repair or final repair in the shop, you’ll probably find that you have a crack line, gap, or dents that need to be filled. On my 3D practice airplanes, I don’t bother, but for the nicer foamies, I like to fill and finish them off. Spackle and joint compound can be used, but it’s best that they’re used in places that don’t require any flexibility. These compounds dry rigid and will crack or crumble if bent.
Beacon makes two products that are designed for our application. Foam-Tac Foam-Finish coats all types of foam, such as Depron, EPP, EPO, BluCor, and Styrofoam, and can be sanded for a smooth surface for paint and decals. This one-part system repairs dents, nicks, and gouges beautifully.
If you have a more serious job to fill, Foam-Tac Foam Filler is the formula you need. This fills imperfections and remains flexible enough to hold, even when the surface flexes. This is a must-have filler!

Steam works great to remove dents and wrinkles from EPP foam. A steamer or pot of boiling water will do the trick.

An assortment of tools to spread glue or fillers will save your fingers and render better results.
• Spreaders: This could be in the category above, but they’re used for more than just fillers, so I gave them their own spot.
Spatulas, putty knives, business cards, and old credit cards all work great for spreading whatever you need. On my foam-core airplanes, many hinged edges are given a coat of hot glue that is spread thinly with the white spatula shown. This leaves a paper-thin, flexible coating for reinforcement and protection.
Epoxies and other adhesives can all be spread using one of these tools. I like business cards and thin credit card-type cards because they can be bent to conform with whatever surface I’m working on.
• Soldering jig: There are a lot of these on the market, and they are invaluable to electric fliers. Most have spots for the most popular connectors and have developed clamping surfaces that don’t act as heat sinks. Sooner or later, you will break a wire or get something that has the wrong connector. This will make your life easier and your aircraft safer because you’ll get a better solder joint.
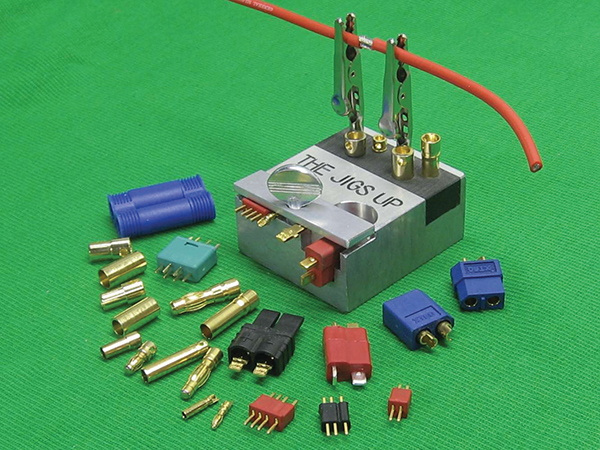
Soldering jigs are like having a helper in the shop when it comes time to rewire an airplane or repair a break. Look for ones with phenolic sections to hold the connectors and not act like a heat sink.
• Sticks, skewers, carbon-fiber rods, and dowels: A selection of all of these will come in handy in the shop. If you break something important, such as I did with the vertical fin on my T-28, you might want to reinforce the repair beyond just the surface break.
I love bamboo barbecue skewers because they have a sharp end and can be pushed into foam easily. Before reassembling the vertical fin, I shoved a couple of these into the top piece then into the bottom piece as I glued them together.
Popsicle sticks are handy as spreaders, reinforcement, etc. Many of my 3D airplanes use carbon-fiber rods and strips to reduce flex on their wingtips, etc. I keep these items in the shop but not necessarily in my field repair box.

Sticks, skewers, Q-tips, etc. all come in handy for reinforcement or spreading substances.
• Scrap foam: Keep a few chunks of various foams around as you go. I’ve been known to grab an airplane out of the trashcan at the field just to cut a few pieces of foam off to have for repairs. These can be used to fill in areas that might be better cut out and replaced than mended.
• Paints: An assortment of craft paints will come in handy for blending in repairs. I keep water-based acrylics in the shop to mix and match as necessary.
• Muffin tins: These little gems are perfect for keeping those tiny screws and things organized (and off the floor) while you’re working on repairs. If you’ve taken something apart at the field, it’s handy to work over a towel so that you can find anything you drop.
• Zip-top bags: In addition to storing spare parts, having a large, gallon-size bag on hand pays dividends when/if you need to change a motor or gearbox shaft. Most motor or gearbox shafts have a circlip in a groove on the shaft that must be removed. They tend to fly, never to be seen again, when pried off. Working inside of a plastic bag will contain any flyaway clips.
• Steam: This might sound weird, but when repairing foam, steam can be a good friend. Many foams will crunch when we have an accident and appear wrinkled, ruining the looks of an otherwise good-flying airplane. Holding the crunched piece over steam and slowly pulling and massaging it will often bring it back to as good as new.
I have a Conair drapery steamer (conair.com) to provide constant steam as I work, but a pot of boiling water on a hotplate or stove will do the same job. For obvious reasons, be sure to wear long sleeves and gloves when working with steam. Go slow and don’t melt the foam with too much heat.
Another way to work a dent out is to put a damp washcloth over the dent and use an iron. The heat from the iron will cause the wet cloth to steam the dent, and many times it will expand back to its original shape.

Straightedges and sharp knives are a must when working with foam or wood.

Two cuts were made in foam-core board with the strippers set to cut just down to the lower layer of paper and no farther.

The center piece is easily peeled from the paper.

After the piece is removed, the board can be bent to right angles and glued with a finished paper edge on the outside.

This E-flite Pitts is constructed of EPO foam that has a beautiful, smooth finish. It’s CA compatible and worthy of repair if damaged.

This 25-year-old, 40-inch Lazy Bee was nearly destroyed and later rebuilt. Balsa construction and a lot of patience were all it took to make it look better than new.
That’s all it takes: It doesn’t take a master modeler’s shop to build and repair your aircraft. It just takes some careful thought and knowing what you hope to accomplish. Start with the minimum and add as necessary. Sometimes experienced modelers scare newcomers with the array of tools and supplies that they carry, but they all started someplace, and certainly didn’t start with every tool known to man.
After you figure out that you can do repairs, aircraft take on a new life instead of being expendable.
By Greg Gimlick | [email protected]


