


Written by Tim Bailiff Build It
As seen in the Spring 2021 issue of Park Pilot
SPECIFICATIONS:
Model type: Park flyer
Skill level: Beginner builder/intermediate flier
Wingspan: 7-1/2 inches
Length: 6-3/4 inches
Wing area: 15 square inches
Weight: 1/2 ounce Power: Special Sauce (or similar) 6 x 15mm coreless motor
Propeller: 1-3/4-inch Gemfan ABS
Battery: 80 mAh 1S 3.7-volt LiPo
Radio equipment: Spektrum DX7 or similar DXM2/DSMX transmitter; E-flite (EFLU6807) all-in-one receiver
MATERIALS: One E-flite all-in-one receiver unit
12 x 12-inch 2mm Depron foam sheet
6 x 15mm coreless 17,000 Kv motor
80 mAh (or similar) 1S 3.7-volt LiPo battery
1-3/4-inch (45mm) Gemfan propeller
One roll 2-inch wide colored packaging tape
One roll 1-inch wide clear packaging tape
One roll 1-inch Blenderm medical tape
10 inches .040 carbon-fiber rod 8 inches .030 carbon-fiber rod
12 inches .020 carbon-fiber rod
12 inches 1/32-inch clear heat-shrink tubing
8 inches .015 piano wire
3 inches .032 piano wire
2 x 2-inch 1/32 plywood
2 x 2-inch 1/32 balsa
Two 11mm micro wheels
.05-inch male nano connector
Free plans Click here for free plans - Sheet 1 🏛️
>> Have I got a fun, little airplane for you!
And when I say little, I mean tiny! Inspired by the ever-popular Slow Stick, this micro airplane is actually a 1/6-scale replica of that very airplane. I named it Match Stick because it’s a little hottie! It has a mere 71/2-inch wingspan and weighs in at just 1/2 ounce. This one is a handful and will definitely keep you on your toes, but it’s also super fun to fly—and talk about easy to transport! If this tiny airplane intrigues you, I invite you to join in on the fun of micro RC aviation by reading on.
This article includes not only construction photos, but also downloadable full-size plans. Hey, full-size means you can use them as templates! I’ve also included a materials list.
You will also need a Spektrum (or similar) DSM2 or DSMX transmitter. You can use 5-minute epoxy for most of the construction, but having some medium and thin CA adhesive is good as well. You will also need a few “scrap bin” items, which I will discuss as needed.
Let’s do this: Begin by using the plans to mark all of your foam pieces on 2mm Depron foam sheeting. I recommend that you mark the right and left wing halves together and remove them as a single piece. This will help create a uniform airfoil along the entire wing.
Cut out your tail feathers. Next, bevel (cut) the right LE (leading edge) of the rudder and the underside LE of the elevator back at an approximate 45° angle. You can use a little fine sandpaper or a fingernail file to smooth any irregular edges.
Airfoil: The graceful little airfoil is created by carefully pressing down and rolling the forward underside of the wing on a 11/4-inch dowel. I used a length of closet rod, but any similarly sized dowel or rod would work fine. The idea is to gently create a uniform arch in the forward third of the wing. This might take a little time but be patient and you’ll be rewarded with a beautifully formed airfoil.
By the way, expect to see tiny creases in the underside of your wing. The top should remain smooth.
To build the wing’s dihedral, first cut the single wing exactly in half. Now prop each wingtip up by 9/16 inch and sand the center sections vertically. Use whatever technique works best for you to achieve a nice, straight seam when the wing halves are mated. Ultimately, there should be a dihedral height of 11/8 inch while one wing half is lying flat on your worktable. Don’t glue them together just yet. One trick I use is to utilize the edge of my building table as a vertical guide for my sanding block.
Covering: Covering is as simple as sticking 2-inch colored packaging tape to the wing and tail surfaces. I chose orange, but this is where you can make the Match Stick your own.
Remember, when you are covering the wing, don’t change the shape of the airfoil or otherwise warp it. You will find that the tape is very forgiving and easily repositioned—if you don’t rub it down. Save that for when you are satisfied with its placement then thoroughly, but carefully, rub it down.
To keep things lightweight, cover only the top of the wing. Finally, neatly trim the tape around all of the sides.
When covering the tail surfaces, plan to do both sides. The cool part is that the tape doubles as the hinges. This hinging is accomplished by covering the entire top of the horizontal stabilizer and elevator with one piece. The bottom side is then covered using two separate pieces. Likewise, the left side of the vertical fin and rudder is covered with one piece and the right side is covered using two pieces. Remember to leave a slight gap between both control surfaces to allow free movement.
Hot wings: Glue your little wing halves together using a light, even application of 5-minute epoxy. With one wing half secured flat on your worktable and the other propped up 11/8 inch, the wing center sections should be aligned and fit snugly. Wipe off any excess glue and allow it to dry.
Now it’s time to epoxy two 3-inch lengths of .030 carbon-fiber rod to each wing half’s LE. Use the glue sparingly. As it sets, check for alignment then place 3-inch lengths of 1/2-inch wide clear packaging tape to smoothly wrap both LEs. This will greatly strengthen the wing and help minimize LE dings and dents.
The final step is to cut out and epoxy the 1/8-inch balsa wing pylon to the bottom center of the wing. Use enough glue to ensure that it is bonded to both wing center sections. With the wing level, ensure that the pylon remains vertical and aligned with the wing joint.
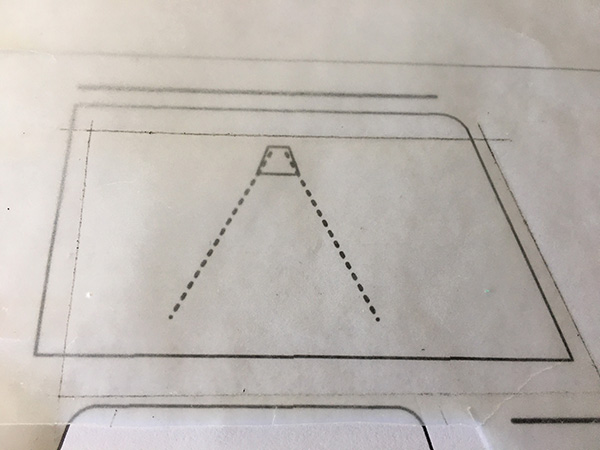
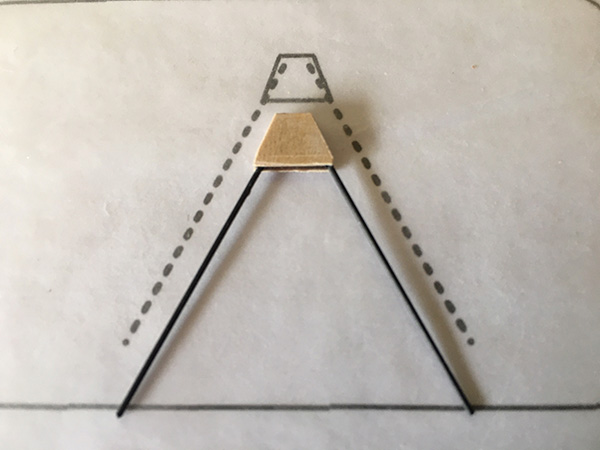
Penciled waxed paper is placed over the plans to create the template.

The tail feathers have been cut and covered with tape.

The wing has been cut and is ready to have the airfoil shaped.

The wing is covered and propped up, ready to be glued.

The wing’s 1-1/8-inch dihedral is visible.
Airframe assembly time: This is always my favorite part because now the little Match Stick really starts to take shape. First, cut a 53/8-inch length of .040 carbon-fiber rod (also known as the fuselage). Epoxy the horizontal stabilizer and vertical fin as shown on the plans to one end of your fuselage. Remove a narrow strip of tape from your horizontal stabilizer so that the rod can be glued directly to the foam. Be sure that your tail feathers remain vertical and aligned as the glue sets.
Now you can make and install your two 1/32-inch plywood control horns. The elevator horn mounts on the top of the elevator, 1/4 inch to the right of the rudder. The rudder horn goes on the left side of the rudder, 1/4 inch above the elevator. Notice that they both angle slightly forward toward their hinge lines.
To mount the wing, measure back 1 inch from the front of your carbon-fiber fuselage. This is where you should position the LE of your wing as you epoxy the pylon to the top of the fuselage. Again, ensure that the pylon remains aligned with the fuselage and the wing stays level as the glue sets.
Landing gear: First, cut two 1/32-inch plywood landing gear brackets and two 11/2-inch lengths of .030 carbon-fiber rod. Use epoxy to sandwich the two rods between the brackets. The diagram on the plans shows the correct landing gear angle. After the epoxy has dried, drill the .040-inch mounting hole in the bracket where indicated.
Next, per the plans, cut and bend two axles using .032 music wire. Use 1/4-inch lengths of 1/32-inch heat-shrink tubing to secure the axles onto the landing gear rods. After checking the alignment, allow a small amount of thin CA adhesive to wick into the heat-shrink tubing. This will bond the wire axles to the carbon-fiber rods. Now, install the 11mm wheels using short pieces of preshrunk heat-shrink tubing as keepers. A touch of CA glue will hold the keepers in place. Be careful not to allow any CA to wick into the wheels—not good!
Mount the entire landing gear assembly by slipping the hole in the bracket onto the carbon-fiber fuselage and sliding it back until the bracket touches the front of the wing pylon. Epoxy it into place, making sure that the gear is aligned and the wing stays level.
Use .015 music wire to fashion the little tail skid as shown on the plans. Use medium CA adhesive to secure it to the bottom of the fuselage just in front of the horizontal stabilizer.

The landing gear struts have been cut and the axles bent.
A landing gear template was used to achieve the proper angle.

The wheels and battery plate details are shown.

The landing gear and airframe have been assembled.
Electronics: The heart and soul of the Match Stick is the E-flite all-in-one receiver unit from Horizon Hobby (EFLU6807; horizonhobby.com). It includes a receiver, 2-amp ESC, and two linear servos. It’s available separately on the internet, but it can also be harvested from a ParkZone Mini Vapor or E-flite UMX Vapor Lite.
Begin by removing any existing motor leads then carefully solder a .05-inch male nano-connector into place. This will allow your motor to simply plug in.
Using hot glue was a simple, yet secure, mounting method. The unit should be positioned upside down under the fuselage, 1/8 inch from the wing’s trailing edge. The servo gears should face forward. This positioning allows for clear and easy access to the servo arms.
By the way, you should center your servos now. This requires binding your receiver unit to your transmitter and making the appropriate adjustments. Continue by gluing the 1/32-inch balsa battery mounting pad into place. It is located directly in front of the landing gear bracket. A touch of thin CA adhesive applied to both sides of the balsa will help strengthen it. Finally, place one side of a self-adhesive mini Velcro dot fastener to the mounting pad and the other side of the Velcro onto your battery. I suggest that you use an 80 mAh 3.7-volt LiPo battery. I found mine online. A 70 mAh battery will also work, but if you choose something different, keep an eye on the center of gravity.

The tail feathers with the control horns glued into place.

The electronics are visible, along with the motor connections and Velcro battery pad.

The pushrods are connected to the rudder and elevator control horns.

The receiver unit is in position and the location of the nano-connector is visible.

The motor, propeller, and mount details are shown.
Pushrods: The two tiny pushrods are made from 2-inch lengths of .020 carbon-fiber rod with 1-inch ends made from Z-bend .015 music wire. Each set of Z-bend ends is held onto the pushrods using 1/4-inch pieces of 1/32-inch heat-shrink tubing. After centering both control surfaces, a tiny amount of thin CA adhesive should be allowed to wick into the heat-shrink tubing to secure the wire to the carbon fiber. Note: All precautions should be taken to prevent CA glue from contacting the servos!
Go ahead and set your throws. Start with approximately 1/8-inch elevator and 1/4-inch rudder throws. Use your dual rates to give yourself some options. I suggest between 60% and 70% so that you can dial things back if needed.
Motor and mount: Using the plans, make the 1/16-inch balsa motor mount and glue it to the end of a 11/8-inch length of .040 carbon-fiber rod. Glue the 11/8-inch rod to the underside of the fuselage rod extending from the landing gear bracket. Be sure the mount remains vertical as the glue dries.
Next, slide the little Gemfan 13/4-inch propeller (sold by Tiny Whoop; tinywhoop.com) onto your 6 x 15mm coreless motor shaft. Plug in your motor leads and make sure the propeller turns in the correct direction. If it doesn’t, simply unplug it and reverse the leads.
Finally, use a small drop of medium CA to carefully secure your motor to its mount. The mount has built-in downthrust, but you will need to provide a few degrees for right thrust. Hey ... you are done!
Time to light things up: What fun you will have firing up your little Match Stick! Find a location that has grass—grass is your friend, especially during your first few flights.
Take off from the ground using full throttle. Allow it to climb to a comfortable height then come back to roughly half throttle. You’ll find that small, smooth control inputs are best. For this airplane, less is more! If you get into trouble, remember to cut the power before impact. It’s so lightweight that grass should not damage it.
Well, good luck my friends. I hope you have lots of fun with your hot little Match Stick. I wish you many happy flights. Fun stuff!


The Match Stick is set against the California sky.

The author, Tim Bailiff, with his Match Stick.
By Tim Bailiff | [email protected] Photos by Maggie Madril


