


Build Your First Free Flight Model Unafraid
Peck-Polymers ezR.O.G.
Rachelle Haughn | [email protected]
Photos by Rachelle Haughn and as noted
Let me start by being honest—delicate balsa scares me.
If you are wondering how balsa can be intimidating, it’s because balsa andI do not have the best history.
A dear friend, Phil Sullivan, first introduced me to the wonders of FF (Free Flight) in the early 2010s at the AMA Nats. I was helping him and the NFFS (National Free Flight Society 🏛️) enter scores in a database for all of the Outdoor FF Nats 🏛️ contests. I remember him mentioning Mulvihill, ROG (Rise- Off-Ground), 1/2A Gas, and Nos Gas, and my head was spinning. Thankfully, he cared enough and loved the hobby so much that he took the time to explain to me what the contests were.
The final year that I helped with the Nats, Phil invited me to the NFFS annual banquet that was held on-site at the International Aeromodeling Center 🏛️, in Muncie, Indiana. There was food, of course, and a raffle. He won a kit for a 1976 MicroX Models Parlor Mite and gave it to me. That was the last time that I saw Phil. We lost him in 2021.
I remember being so excited to have the kit that included “indoor wood,” condenser paper, plans, and instructions. I wanted to cut out the parts and put it together right away. Not knowing how fragile lightweight balsa could become after years of storage, as I enthusiastically pulled one of the pieces out of the box, it snapped. I was devastated. I had no way to replace that piece.
Today, that sad box of broken balsa sits on a shelf in my cubicle at work. It is a reminder of Phil’s friendship, the days I spent in the Muncie summer heat, and that a little piece of wood could make me feel defeated.
I am proud to say that now, thanks to the Peck-Polymers/Wind-it-up Enterprises ezR.O.G. kit 🏛️, I am no longer afraid of balsa!
Yes, I have made mistakes along the way. Yes, I have had to reglue parts multiple times because of my initial fear of applying too much glue and adding unnecessary weight. Yes, I have almost cried. But I have also triumphed. If not for this beginner-friendly balsa kit, my desire to again attempt building with balsa could have been squelched.

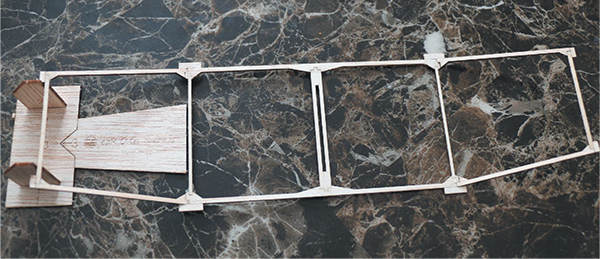
All of the components that come in the ezR.O.G. kit.

The landing gear wheels, wheel retainers, and rubber hook doubler came packaged together in a small bag to make it easier to keep track of them.
Building the ezR.O.G.: As soon as the ezR.O.G. kit arrived in the mail, I was eager to open the box. I carefully removed all of the components and laid them out for a photo. I liked how the landing gear wheels, wheel retainers, and rubber hook doubler were all together in a small bag so I couldn’t lose them.
The kit came with a few options for tissue covering. Chuck Imbergamo of Wind-it-up Enterprises LLC 🏛️, owner of Peck-Polymers, was kind enough to send me a second kit and additional tissue paper, just in case I would need them. (As it turned out, I would. I will explain later.) If you are a beginner builder such as I, I suggest purchasing a second kit just to be safe.
As I looked over the kit components, what stood out to me was the quality of the laser-cut parts. It was clear that Wind-it-up put much effort into designing the components and carefully labeling them for beginners. Removing the parts from the balsa sheets was also simple and required no tools.
Another part of the kit that I liked is that everything needed to build and cover the aircraft is included. The only tools required are sandpaper or a file, a glue stick, and some medium CA adhesive—things that most modelers would likely already have on hand. Despite this being a rubber-powered FF model, no winder or stooge was required.
I found most of the components easy to build and the directions easy to follow. I had to reread a few of the step-by-step directions more than once. Chuck said he has since added more details in the directions, including the flying portion.
The building steps that somewhat tripped me up were the wing, tail, and rudder components. These pieces come with tabs near the joints to make it easier for the builder to properly align the parts. When building the rudder, one corner was missing an alignment piece. I was afraid it was a crucial component, so I used my backup piece. I then accidentally broke off the alignment piece on that part. As it turned out, I later learned that the alignment tabs were not necessary for the build, but did help. This was especially true with the wingtips.
I found the next step, building the fuselage, to be the easiest. There is a line on the fuselage that clearly shows where to place the pylon. Attaching the hook doubler was also simple, but be aware that the balsa for this is much thinner than the rest of the balsa that is used for the aircraft. When I built my second fuselage, I accidentally snapped the doubler while removing it from the plastic bag.

Oops! One of the alignment tabs broke off.
The kit includes components needed to build a dihedral jig, which is used to create the dihedral in the wing. Before you create the dihedral, ensure that the two pieces that connect to the wingtip rib are parallel with each other. I accidentally glued one in crooked at first, creating a warp in the wing.

The first thing that a modeler must build is the dihedral jig, which will be used later in the construction.

The nicely laser-cut parts come with directions and guides on them for beginner builders, such as this glue line marking on the fuselage.
I also did not get equal dihedral on both wingtips. I think this was because of the warping that I created. When I built my second ezR.O.G., I made sure that there was no warping before I made the dihedral. I also added more glue than the first time around.
Before applying the tissue covering, I learned that the alignment tabs could be removed. I popped them off with my fingernails, which was somewhat easy to do. I was slightly nervous that I would snap too hard and break something important. The directions state that the tabs can also be removed with scissors.
After removing the tabs, I began applying the tissue. The glue stick that I used first was an off-brand and did not work well. I switched to an Elmer’s glue stick and that adhered the tissue to the balsa much better.
Removing the tabs made me realize that I had not used enough CA glue on the joints. As I removed one alignment tab on the rudder, one of the joints snapped. When I took off another tab, a piece again came apart. I applied more Gorilla Super Glue and held the components together as they dried.
When the glue stick was dry, it was time to begin sanding the tissue to remove it from the edges. For some areas, I cut away the excess tissue with a pair of scissors then sanded with a small strip of sandpaper near the balsa edges. This again proved that my fear of using too much glue and adding unnecessary weight resulted in me not using enough adhesive. Things began to fall apart again, but I simply reglued them.


The final steps before the maiden flight included assembling the landing gear (which was super simple), adding the paper trim tabs, the propeller, and putting on the rubber motor. I got confused at first and thought I needed to put two knots in the rubber motor, but a coworker read through the instructions with me and helped me realize that I only needed one. Now it was time to fly!
The maiden flight took place in the Claude McCullough Education Facility 🏛️ at the National Model Aviation Museum 🏛️ in Muncie. The instructions state to hand wind the propeller roughly 100 turns clockwise, if facing the front of the model (so counterclockwise from the pilot’s view). Knowing that I did not have much altitude with which to work, I only spun the propeller roughly 50 times. This turned out to be ample power for this little FF model.

Michael Smith launches the airplane on its second (somewhat) successful flight. Jennifer Alderman photo.
Michael Smith, the director of the museum, showed me how to properly hold the model while winding the propeller and how to hand launch it. Because of the wing warp that I had accidentally created, the airplane would take off straight, but then nosedive. It did taxi well and moved out fast. I knew that if I had more airspace, the aircraft could reach great heights. Michael suggested that I adjust the wing joints to eliminate the warp.

EzR.O.G., take two: When I attempted to remove the tissue from the wingtips, the joints began coming apart. I decided to build a whole new wing. When I removed the wing from the fuselage, part of the pylon broke off. I decided to start from scratch.

My second ezR.O.G. turned out much better! I took my time and made sure that all of the components on the wingtips were parallel on my building surface. There was no warping! This made it easier to create equal dihedral in the wingtips. I chose different colors for the tissue covering and decided to keep all of the alignment tabs to create more stable joints. This second airplane looked how I imagined that Chuck had hoped it would.
I took this one to my church, took some photos of it, and began winding the rubber motor. Because it is technically a ROG aircraft, I wanted to launch it from a table as competitors do at the Outdoor FF Nats. The ceiling was much higher, and the only obstacles were lights hanging from the ceiling. Unfortunately, I wound the motor too tightly, got it stuck on the fuselage, and the fuselage snapped in half. I was disappointed, but happy with my craftmanship.
Although my flights weren’t as successful as I had hoped because of my inexperience with building and lying, I definitely learned a lot from this undertaking. I hope to build something again this spring that has slightly thicker balsa and isn’t too lightweight to fly outdoors.
According to Chuck, the ezR.O.G. has been built by other modelers who had successful outdoor flights with it. The winter wind in Indiana was too strong for me to risk an outdoor flight.
Chuck hopes that the aircraft can be built in a classroom setting. Smaller hands should be steadier than mine. Ideally, the airplane could be built in concert with a STEM (science, technology, engineering and math) curriculum.\
Here’s to my next build! I think Phil would be proud.

Proof that the ezR.O.G. can fly outside, in light wind. Photo provided by Wind-it-up Enterprises.


