


The Cessna Bird Dog “A Soldier’s Best Friend”
Pilot’s Choice Product Review
By JERRY PARKS | [email protected] As seen in the Spring 2023 issue of Park Pilot
The Cessna Bird Dog (Photo 01) could be the next addition to your hangar of electric-powered RC park flyers. Of course, you will need to build it, supply your own electronics, and decide how it will be covered. I was able to get a first-cut prototype of the model and thought it would make for a perfect park flyer build/review.
This model will appeal to warbird enthusiasts, as well as general aviation fans. If you are not familiar with the Cessna Bird Dog, you might still immediately recognize the classic high-wing look that comes directly from the 170 through 190 series Cessna aircraft (Photo 02).

The Cessna Bird Dog - a model that you won’t want to miss!

Notice the classic high-wing look of the Cessna Bird Dog, a characteristic carried over from the 170-190 series of Cessna aircraft.
History of the Bird Dog: Provided by the Warhawk Air Museum 🏛️
In 1950, Cessna was awarded a military contract to produce the L-19 (liaison) aircraft (Photo 03). The U.S. Army wanted to replace its aging fleet of fabric- covered Piper L-4 Grasshoppers. The L-19 would be an all-metal liaison aircraft used for observation duties and adjusting artillery fire in active battle zones. Much like a “bird dog” points out prey to a hunter, the L-19 would become known by pilots and ground troops as “A Soldier’s Best Friend.”

The 1950 Cessna L-19 Bird Dog. Photo courtesy of the Warhawk Air Museum
The Bird Dog had a lengthy career in the US military and in other countries, serving under two aircraft designations: originally as the L-19 (liaison) and later revamped as the O-1 (observation). The Cessna Bird Dog was officially retired from US military use in 1974.
Getting Started
The 40.5-inch Bird Dog kit is available through BMJR Models and is offered in two versions. This review is based on the park fl yer version with a dihedral wing for rudder elevator control (kit B-339; $166). BMJR also offers a sport scale aileron/fl ap wing version (kit B-340; $175).
After you inventory the parts, I recommend reading through the instruction booklet and taking note of the build hints and corresponding pictures. As with any manufacturer, there is a rhythm to the build flow. Familiarizing yourself with the instructions helps relieve some of those head scratcher moments.
Next, you will need to source your electronics for the build. For the parkflyer version, I used a generic 150-watt brushless outrunner motor, a generic 20-amp ESC, and two Hitec HS-81 servos. I then cut the rolled plan into manageable sections: fuselage, wing, tails, etc. (Photos 04 and 05).

The plans for the Cessna Bird Dog.

Jerry Parks cut the rolled plans into manageable sections: fuselage, wing, tails, etc.
Start Building
The first building step is the fuselage. The fuselage crutch and buildup do not require building over the plans. However, I believe it is useful to have the fuselage plans section under waxed paper for constant reference.
You will need to mount the rudder/elevator servos in the fuselage quite early in the build process. Now is a good time to center them, fi t the servo arms, and add the two brass EZ connectors that will accept the carbon-fiber pushrods.
(Build note: When mounting your servos, remember that the fuselage is being built upside down at this point.)
Follow the fuselage build instructions, including pre-fitting the motor to the firewall and test-fitting the cowling. Stop short of sheeting the fuselage and set it aside (Photos 06 and 07).

Prefitting the motor to the firewall is a crucial step to ensure that the final hookup goes smoothly.

Jerry shows his process of test-fitting the cowling, another essential part of the building process.
(Build note: You will be able to insert and remove pushrods as you complete the build. However, planning and test-fitting is your friend, ensuring that the final pushrod hookup goes smoothly after covering.)
Next, build up the horizontal stabilizer, elevator, vertical stabilizer, and rudder. Rough-fit them to the fuselage, as this will help you determine the needed pushrod length. Follow the instructions to add metal wire to one end of each carbon-fiber pushrod. The end of the carbon-fiber rod will fi t into the brass EZ connectors on the servo arms. The wire ends will go into the micro EZ connectors that you will attach to the control surfaces (Photos 08 and 09).

Once the horizontal and vertical stabilizer are completed, they should be test fit on the fuselage to help determine the pushrod length.

Rough-fit the horizontal stabilizer, elevator, vertical stabilizer, and rudder to the fuselage—this is done to estimate the pushrod length required for building.
It is now time to sheet the fuselage.
(Author’s Note: One thing I recommend before sheeting the fuselage: Use a couple of 6-inch sections of drinking straw and place them inside the aft end of the fuselage, where they will exit at the precut pushrod exits of the sheeting. This will ensure a smooth final assembly after covering. Tacking the straws in place with medium CA adhesive seems to work fine [photo 10].)

Jerry recommends tacking 6-inch sections of drinking straw to the inside of the aft end of the fuselage. He found that doing this will assist in a smooth final assembly.
Moving Onto the Wing Build
This is a great time to grab your favorite beverage or a cup of coffee and take a good look at the center panel instructions and corresponding picture. The center section is not difficult to build, but being built square and sturdy will make joining the wing panels almost fool proof (Photos 11 and 12).

Building the center section square and sturdy will be beneficial to future steps in the building process.

With the center section sturdy, joining the wing panels is easier than ever!
The left/right wing panels are a very straightforward build (Photo 13).

The building process for the left/right wing panels on the Cessna Bird Dog is a breeze!
(Note: The wing-tip spar section is 3/32 by 3/16. All other spar sections and the LE [leading edge] are 3/16 squares.)
(Author’s Note: The only deviation I made from the wing build instruction was to tack-glue W2 in place to W13 and the bottom spar. I found this made fitting and checking dihedral measurements easier when joining the center and wing panels together. Just remember not to glue the LE to W2 yet, as you will need to fit W3 into place once you’ve set and glued the dihedral [Photo 14].)

Jerry deviated from the build instructions by tacking W2 to W13 and the bottom spar—he wrote that this made fitting and checking dihedral measurements much easier!
Once you have checked off each of the build steps in getting to this point, you are now ready to sand, shape, cover, and do the final assembly. There are a number of covering choices that would work great for this kit. I used UltraCote Park Lite, as I had some olive drab available.
(Author’s note: Before the final sanding and covering, I like to prehinge the control surfaces. This makes centering the hinges on the mating surfaces easier.)
(Tip: Mark the hinge locations with a black Sharpie, then take a picture of a ruler next to the marks. This makes for easy referencing of the hinge slot locations after covering [Photo 15].)
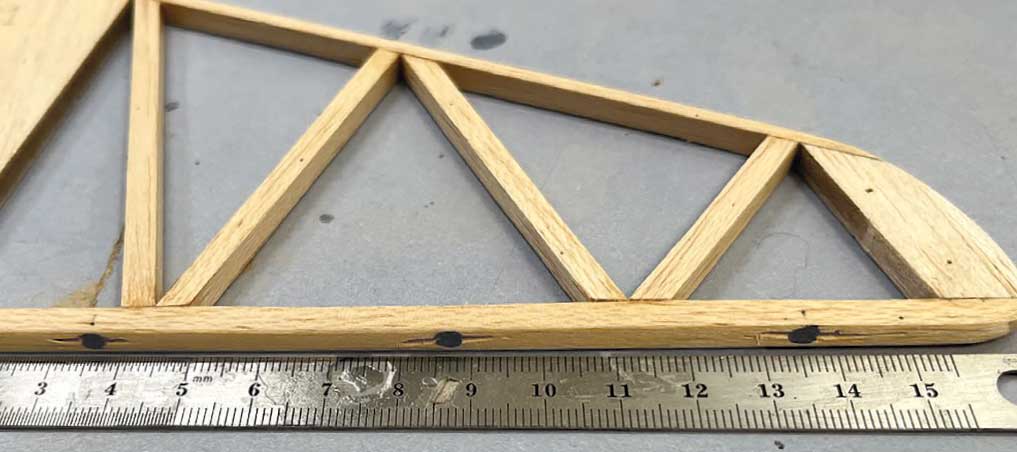
A tip from Jerry is to mark the hinge locations with a black Sharpie before taking a photo of the markings next to a ruler. He advises this because it makes for easy referencing of the hinge slot locations after covering!
I purposely did not cover all parts of the build: sheeting wing panels, cutting and attaching windows, bending wire, etc. These are well-addressed in the instructions, and I believe that most builders have their own methods to achieve the level of finish that they require.

The stunning final product built by Jerry!
(Performance tip: Add 1° to 2° of downthrust and 1° to 2° of right-thrust angle when attaching the motor mount to the firewall.)
Getting ready for the maiden flight, a good starting point for the CG (center of gravity) is roughly 29% of the wing cord. This equates to 17/8 inches or 47mm from the LE. This is cautiously a little nose-heavy. I started with a 3S 1,300 mAh LiPo battery, balanced as aforementioned, without any additional weight required. As such, if I choose to work the CG back a bit, I will opt for a slightly smaller battery. My all-up weight for this model was 19.05 ounces/540 grams.

Jerry’s Bird Dog is ready for its maiden flight!
My maiden flight and subsequent initial flights were off of thick, dormant grass. With up-elevator and ½-plus throttle, it rolled out and was up and away. If you find yourself in a similar situation, be ready to back down the power as soon as the airplane is airborne. Dihedral wing rudder/elevator setups can overemphasize climb and yaw under heavy throttle.
All other aspects of my initial flights were uneventful, requiring a couple of clicks of rudder trim. I was pleased with how well it slowed down for pleasurable ovals around the soccer field. There was plenty of rudder authority and it did not exhibit any tip-stall tendencies. Minimal elevator inputs were more than adequate during flight. On non-powered landings, the airplane kept elevator authority for fl are. Successful maiden flights always bring a smile—even more so when you build what you are flying (Photos 16-19).

The classic high-wing look is prominent in Jerry’s newly built model.

Another great shot of Jerry’s final product.
Overall, I consider this kit to be in the “intermediate” realm of build difficulty—the most difficult parts were fitting/securing the front and rear windows and sheeting the turtledeck.
Fly safely, have fun, and try to share the hobby of building what you fly.
SPECIFICATIONS:
WINGSPAN: 40.5 inches WEIGHT: 19 ounces WING AREA: 241 square inches BATTERY: 3S 1,300 mAh LiPo PRICE: $166-$175 INFO: bmjrmodels.com FEATURES:
- Completed airframe is sturdy and looks the part of a Cessna Bird Dog
- Laser-cut parts are robust and well-marked, and sticks are easy to work with
- All necessary hardware is supplied with the kit and is of good quality
- Wing is easily removable
- Steerable tailwheel
- CG is easily achieved with choice of battery


