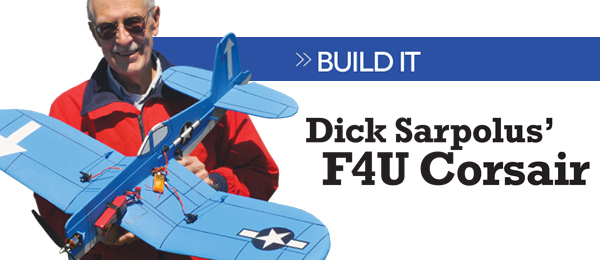
Designed by Dick Sarpolus. Free plans from Spring 2015 Park Pilot.
Specifications and Requirements
Type: Profile warbird Skill level: Intermediate Construction: Sheet foam; plywood; hot-wire-cut foam wing Wingspan: 41 inches Wing area: 400 square inches Weight: 22 Length: 31 inchesMaterials
• 150-watt brushless motor and 18-amp ESC • 11.1-volt three-cell 1,800 to 2,200 mAh LiPo • Four-channel micro receiver; four micro servosBuild It Article
The F4U Corsair is one of the most easily recognized World War II fighters. The inverted gull wing, the big round engine, and the huge propeller all identify Chance Vought’s Navy fighter. Most warbird fans know that the bent wing was used to accommodate the engine and propeller, at the time it was the most powerful engine and largest propeller ever used on a fighter. The Navy started a design competition in 1938, and the Corsair first flew in 1940. A production contract was awarded in 1941 and the airplane entered service in 1942. More than 5,000 Corsairs were eventually built by three companies: Chance Vought, Goodyear, and Brewster. The F4U Corsair was even the star of a TV series, Baa Baa Black Sheep, the story of Marine Corps pilot Greg “Pappy” Boyington’s fighter squadron VMF-214, the Black Sheep squadron. They flew F4U Corsairs from an island base in the South Pacific and were said to be pilots who were “a collection of misfits and screwballs who became the terrors of the South Pacific, known as the Black Sheep.” The series ran from 1976 through 1978. Like most modelers and aviation fans, I always liked the Corsair, but never built one because I was scared of that gull-wing section construction. I’ve been having fun with low-cost, quick-to-build, and easy-to-fly foamie profile electric warbirds and decided to try for an easily built foam wing, using my “standard” foam wing cores for these models. It’s a pain, but if you want a Corsair, you’ve got to build that wing. The basic wing core is hot-wire-cut foam with a thick symmetrical section, the rest of the airframe is 5mm or 1/4-inch thick sheet foam. Any kind you can get should work.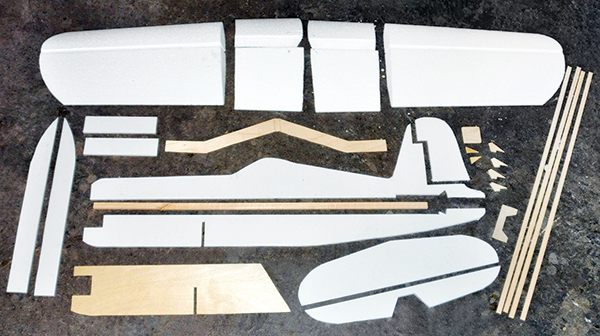
Here are the materials you’ll need to construct the Corsair.
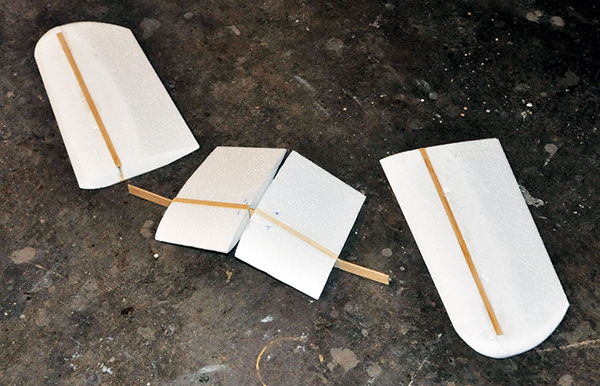
The wing spars are 1/8 x 3/8 basswood. A space is left between the two wing panels so the fuselage can be slipped into place. It is slotted to drop down over the plywood wing joiner.
If you don’t have access to hot-wire cutter, The Core House (home.earthlink.net/~philcartier/webcat/catalog.html) has a computerized cutting setup, sells at a reasonable price, and has cut hundreds of this wing core. The cores are cut to a 24-inch length, and you trim them for the proper tip shape. For the Corsair, the wing cores are cut into sections, with the angles so they can be joined to form the necessary shape. The 1/8-plywood wing joiner is sized to fit between the upper and lower spars in the core. The short center panels are cut into front and rear sections, and glued to the joiner. The inner ends of the tip panels are slotted for the plywood joiner before the spars are glued into them. The wing spars are 1/8 x 3/8 basswood, which is available at hobby shops or arts and crafts stores. A space is left between the two wing panels so the fuselage can be slipped into place. It is slotted to drop down over the plywood wing joiner. The angle cuts on the foam core sections aren’t too critical. Five-minute epoxy glues the foam cores to the plywood joiner, the upper and lower spars are epoxied in place, and lightweight spackling putty will fill in any gaps. I cut the sheet foam parts out with a sharp scalpel-type modeling knife and the aid of a metal straightedge. The 1/32-plywood fuselage nose section doublers add strength to the fuselage, and a strip of basswood glued into the fuselage adds the needed rigidity and strength. You could use a fiberglass tube if you prefer. I usually build with five-minute epoxy because I’m always in a hurry, and the epoxy sticks well to most foam. The types of foam with thin plastic covering on both sides need holes poked through the plastic where the epoxy will be going. Sand the foam on the wingtips to get a decent-looking rounded shape, and vinyl spackling putty works well to fill in gouges and rough spots. The foam wing panels don’t have to be covered for strength, but an iron-on plastic covering keeps them clean and smooth, and can easily be painted. I like the SLC covering sold by The Core House. It’s lightweight, goes on easily, and accepts most types of paints. Hinging all the controls surfaces is done in the usual foamie manner with 2-inch wide clear plastic packaging tape. The leading edges of the ailerons, elevator, and rudder are cut and sanded to an angle, and the tape applied to the upper surface first. With the control surfaces folded upward, the tape is applied to the bottom, pushing it into the hinge gap and sealing it to both edges. This provides free movement and a strong, completely sealed hinge gap. The motor mounting firewall is 1/8 plywood, epoxied in place with plywood gussets on both sides of the fuselage for added strength. The motor is held on with four small screws into the firewall. The servos are mounted by cutting holes into the foam so the servo is a push fit, and it is held in place with a few dabs from a hot glue gun. Slots are cut into the control surfaces and the 1/16-plywood control horns are epoxied into place. I use .047 wire for all the pushrods, with a Z-bend on one end and Du-Bro’s Mini E/Z Connector (dubro.com) on the other. Hot glue short pieces of nylon tubing or wood braces to the fuselage to keep the pushrods from flexing. The ESC, receiver, and LiPo battery pack are mounted to the fuselage with hook-and-loop tape. For the battery, I cut slots through the fuselage above and below the battery pack and use a hook-and-loop strap for added security. I paint my foamie warbirds with inexpensive, water-based acrylic craft paint, available in many colors from arts and crafts stores. A small foam brush can be used to quickly and easily apply the paint, or you can use an air brush or small spray gun. I use a Sharpie marker to draw panel lines and other scale detailing on the airframe. The detailing really helps the scale appearance. Military insignia is available through hobby outlets in stick-on vinyl, or can be copied at a local copy shop onto peel-and-stick paper. Copier ink isn’t waterproof, so I spray the paper copies with flat, clear polyurethane before sticking them on the airplane. The motor I used is a 150-watt brushless outrunner that offers lively performance. I like the BP Hobbies 2212-13 motor (bphobbies.com), the company’s 18-amp ESC, a 9 x 5 propeller, and a three-cell 1,800 or 2,200 mAh LiPo battery pack. I used four small, lightweight servos.
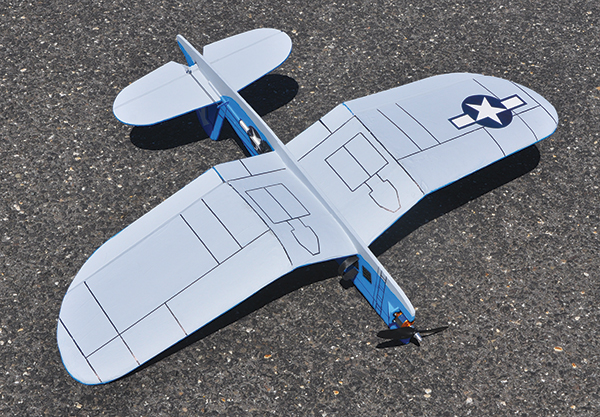
Scale appearance can be improved using a Sharpie marker to draw panel lines and other scale details on the airframe.
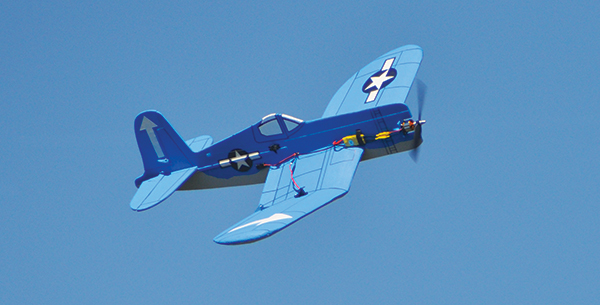
The Corsair is a reasonably inexpensive model that provides an enjoyable warbird flight experience.
This Corsair is easily hand launched with an underhand toss at full throttle, and it will jump out of your hand into the sky. Hey, this isn’t an accurate, super-detailed scale project. It can be described as “cartoon scale,” but it provides a lot of flying fun for not too much effort and cost. This stuff is fun!
Free Plans
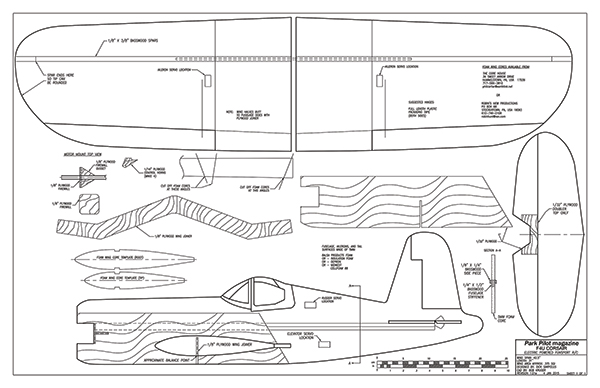 Click here to download your free F4U Corsair Built It Plans.
Article:


Comments
Park Pilot Reader (not verified)
Hot dog! Looks great!
Sat, 06/06/2015 - 15:48Hot dog! Looks great!
Sidney Hill (not verified)
F4U Corsair
Fri, 03/31/2017 - 11:25Very nice good looking model. Are tied plans available?
Thanks much Sid
Thomas U (not verified)
Super Cool!
Tue, 07/25/2017 - 13:16Looks awesome and fun! Thank You :)
thunderbirdsrgo (not verified)
Appreciative
Fri, 07/28/2017 - 01:00I am looking forward to building this one. Thank you for the plans and instructions.
Add comment