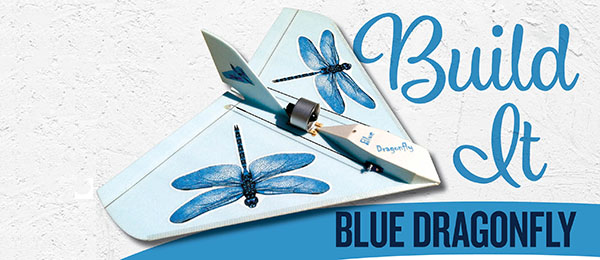
Written by Tim Bailiff Build It As seen in the SUMMER 2020 issue of Park Pilot
Download free plans!

Full-size plans Click here for full plans - Sheet 1 🏛️
Tiled plans Click here for tiled plans - Sheet 1 🏛️
>>Once again, summer has provided Southern Californians with some beautiful flying weather. Although midday has often been blistering, most mornings have been cool and calm. In fact, it has been the perfect weather in which to try some new designs that I’ve thought about.
One design has proven to be so much fun that fellow pilots at my flying club asked for a set of plans so that they could build one. They also suggested that it would make another interesting construction article. So, here we are. This exciting little airplane is a combination of ideas taken from several of my previous designs. First, I wanted to use an EDF (electric ducted fan) for this project. In a previous article, I used a 30 mm EDF for my small, round Disc-O. This time I decided to step up to a 50 mm fan.
I chose to use a cropped, delta-shaped wing, similar to my Firecracker and On the Fly deltas. I increased its wing area to support the additional weight of the larger EDF unit, battery, and electronics. This combination proved to be a fast, yet stable flying wing that is super fun to fly. It is highly maneuverable and can blaze through the sky, and yet it slows down nicely, allowing for gentle and uneventful landings. Plus, this delta wing is so simple and quick to build, it’s easily a weekend project.

Tim Bailiff demonstrates the launch technique that is required for the Blue Dragonfly.
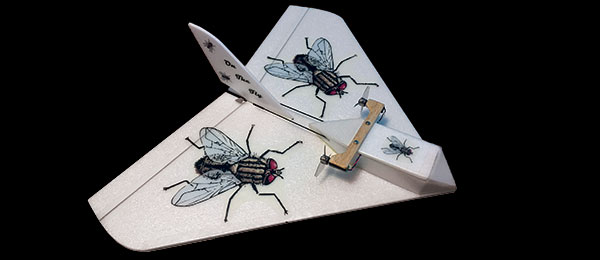
Name game: As for the name of this airplane, it came to me as I was cutting out the wing from a piece of Dow Bluecor (dow.com/en-us) foam. If you are unfamiliar with this material, it is wonderful stuff to work with. In our hobby, it has been widely used and often referred to as fanfold foam. As its name suggests, it is blue.
During the summer, my backyard is frequented by one of my all-time favorite insects, the dragonfly. I never tire of watching them cruise around the yard. So, with that in mind, I bring to you my latest RC offering: the Blue Dragonfly.
Full-size plans: Within this article you will find many construction photos. Use them to help clarify any details. Although this is a simple project, I decided to draw and include full-size templates/plans. Cool right?
If you would like a set, which you probably do, simply download it to your computer. Next, save it to a compact storage device (memory stick, etc.) then take it to your local office supply store that provides copying services. Tell them the document is 30 x 30 inches and that you would like it printed full size.
For just a few bucks, you will have a nice set of full-size plans and templates. How easy is that? Hey, if you want to be a real pal, consider printing a few extra copies for your flying buddies.
A few suggestions: First, I recommend that you read this entire article before you start the build. Knowing what comes next can speed up an already quick build even more. Also familiarize yourself with the materials list before you buy anything. You might already have much of what’s needed tucked away in your supply drawer.
If you find that you do need something, if possible, cruise down to your local hobby retailer before hitting the internet. In today’s economic climate, I know the owner would appreciate your business. With that being stated, the internet remains a terrific resource.
As for glue, I used 5-minute epoxy throughout. Please also note that the electronics section of the materials list is how I suggest that you equip your airplane. I own a Spektrum DX7 V2 (spektrumrc.com) transmitter, so I chose components that were compatible. If you wish to substitute anything, be my guest. Just ensure that the CG (center of gravity) remains the same and watch the weight of your airplane. Remember, lighter flies better.
For your information, the flying weight of my ready-to-launch Blue Dragonfly is 9.25 ounces.

This shows how the wingtip was made using a French curve.

The beveled elevons allow for free movement.

Shipping tape on the underside provides strength for the wing.

The vertical fin is positioned along the centerline. Note the Blenderm hinges.

Shipping tape on the LE adds durability to the aircraft.

The completed wing and vertical fin.
Let’s discuss the foam. The majority of material used to construct the Blue Dragonfly is Bluecor. This is construction-grade insulating foam board. It is 1/4-inch thick, extruded polystyrene board with a thin plastic film on both sides. The plastic film is bonded to the foam using heat, not glue. This makes for a nice lightweight, yet stiff piece of foam that’s easy to work with. It reminds me of lightweight balsa.
Okay, prepare yourself—it’s sold in 50-foot lengths! Each piece is 4-feet wide, 50-feet long, and fan-folded every 2 feet. I know it sounds like a huge stack of foam, but it’s surprisingly compact and manageable. A folded bundle is 2 x 4 feet and roughly 10 inches thick. It’s actually easy to store, especially if stood up.
At this point you might be asking yourself what modeler needs 200 square feet of foam board. Well, one modeler may not, but several might. The last time I purchased Bluecor, I split the foam board and the cost with two of my fellow modelers.
Should you choose to use a different variety of foam, such as Depron (depronfoam.com), that’s fine—just be aware that it might also be more flexible. This can be minimized by using some strategically placed shipping tape and a carbon-fiber tube. I will cover that later in this article. With that stated, 6 mm Depron is a good choice because it is very close to Bluecor’s thickness.

The vertical fin is positioned along the centerline. Note the Blenderm hinges.

Shipping tape on the LE adds durability to the aircraft.

The completed wing and vertical fin.
Start your build: By now you have likely noticed that Bluecor has black printing and graphics on one side. Make that the bottom of the wing and leave it as is. I think it adds character and is a great conversation starter. The other side is unmarked, so that will be the visible side that you can later customize.
You will also notice that there are tiny holes on the surface, as well as some ridges and other irregularities. Don’t be concerned by any variations in the texture of the plastic skin—it’s just part of it.
Using the full-size plans/templates, carefully cut out your wing, vertical fin, both fuselage sides, and two fuselage spacers. Include your elevons as part of your wing and cut them off afterward.
When cutting out the fuselage sides, remember to make a left and a right side so that you can keep the printing on the inside. Use a straightedge to help keep your straight cuts true and a French curve for the attractive curved lines of your wingtips and vertical fin.
Elevons: The beauty of your Blue Dragonfly lies in its simplicity. It flies using only two control surfaces: the elevons. Go ahead and remove (cut) both elevons from the TE (trailing edge) of your wing. Use the plans to guide you. Remember to remove the 1/4-inch piece along the centerline from between them.
Cut a 45° full-span piece from the underside LE (leading edge) of both elevons. This will allow them to move freely into their full down position. Using 1-inch wide Blenderm medical tape, hinge each elevon along its entire top LE and the wing’s top TE. Be sure to leave a slight gap to allow for movement.
I purchased my Blenderm by the box from an online medical supply company. I noticed, however, that my local hobby shop started selling it by the roll and called it hinge tape.
Reinforcing tape: Next, you will apply various lengths of Scotch Brand shipping tape to the underside and LEs of your wing. This shipping tape has bidirectional fibers embedded in it. When placed strategically, it adds a tremendous amount of strength to your wing.
To prepare to apply tape to the bottom of your wing, lightly draw a centerline, from nose to tail, down the middle of the wing. Apply a length of the 2-inch shipping tape to the widest part of the wing, from wingtip to wingtip. As you do this, ensure it is perpendicular to the centerline of the wing and keep the wing flat to prevent any warping from being built in.
Thoroughly press the tape down, being careful not to crush the foam. Trim the overhanging tape along the contour of the wingtips.
Continue by placing a second piece of shipping tape perpendicular to the centerline, centered 71/2 inches behind the nose. Note that this is where your CG is located. After pressing it down smoothly, trim any excess along the wing’s LEs.
Place a 3-inch length of tape on the underside of the nose, again perpendicular to the centerline, and trim accordingly. This will reinforce and protect that vulnerable area of the wing.
You will next reinforce the wing’s LEs. Start by carefully slitting 20 inches of the 2-inch Scotch Brand shipping tape lengthwise, making two 1-inch wide pieces. Working one side at a time, carefully apply each piece along the flat, forward-facing section of the LE.
The tape should extend from the tip of the nose to where the wingtip begins to curve. Carefully fold the tape back, pressing it down onto both the top and the bottom of the wing. Work slowly to avoid any wrinkles or bubbles. When finished, the 1-inch wide tape should reach approximately 3/8 inch onto the top and bottom of the wing. Use the construction photos for clarity. Take your time and you will be rewarded with nice, neat LEs.
The spar: Start by cutting a 16-inch length of 5 mm carbon-fiber tube. Lightly sand your spar to help roughen it and provide some “tooth” for the glue.
Using a sharp hobby knife, make a shallow 1/8-inch cut through the longest piece of the 2-inch shipping tape that you attached to the bottom of the wing.
Center your cut within the tape’s width and length. Press the spar deeply into the cut, compressing the foam to roughly half its thickness (about 3 mm). Remove the spar and liberally apply 5-minute epoxy into the slot that you just created.
Note: The spar doesn’t need to be pressed flush with the bottom of the wing. Approximately halfway in is fine.
Wipe away any excess glue and allow it to set up. Finish by placing an 18-inch length of 2-inch shipping tape over the spar. Hey, your Blue Dragonfly’s wing is done!
Vertical fin: Okay, it’s time to work on the top. Begin by lightly drawing a line down the centerline of your wing. Using a toothpick, gently pierce the skin of the Bluecor every 1/4 inch along the rear 4 inches of the line that you just drew. The holes don’t need to be deep—just enough to allow the glue to penetrate the skin and adhere to the foam. Use 5-minute epoxy to glue the fin into position. As the glue sets, be sure the fin is vertical and remains aligned with the wing’s centerline.

The ESC and EDF connection are secured under the wing.

The radio compartment will also accommodate the battery.

The compartment has been secured on the wing.
Motor mount: The method that I used to mount the 50 mm EDF proved to be a sound installation. Epoxying the fan shroud to wooden rails and then screwing the rails to wooden mounts produced a securely mounted EDF that was also easily removable.
Using 1/4 x 1/8-inch lengths of any hardwood is fine, but I fashioned mine from chopsticks. Use the templates to cut both sets of rails and mounts. Cut away the skin and a small amount of foam where it is indicated on the plans and press the mounts into the foam. The top of the mounts should be flush with the top surface of the wing. When satisfied with their fit, epoxy the mounts into place.
Using four #0 x 1/4 panhead screws, secure the rails to the mounts as shown. You should first drill 1/6-inch holes in the ends of the rails and then 1/32-inch pilot holes into the mounts. Be sure they are parallel with the wing’s centerline.
With the four wooden pieces secured, place the EDF unit onto the rails as shown on the plans. Note on the plans that two holes are needed for routing the EDF and ESC leads. One is cut just ahead of the vertical fin; the other is inside of the radio compartment, right at the CG. This allows the leads to pass down through the wing and connect beneath it.
You next need to file and sand the two rails to accommodate the forward-flared bell of the EDF shroud. This allows the fan unit to sit level on the rails. Lightly sand the EDF’s shroud where it touches the rails. This will again provide some tooth for the epoxy to bond to.
When you are satisfied with the fit, epoxy it into place. As the glue dries, be sure the EDF remains squarely seated and aligned with the wing’s centerline.
Radio compartment: It’s time to build the fuselage (aka radio compartment). It is constructed of both Bluecor and 3 mm Depron foam. Using the plans as a guide, cut two side pieces and two spacers from the Bluecor. Note where to place the folds on the two side pieces. You will need to remove a small wedge from the inside of each fold point. Be careful not to cut through to the outside skin. Remember to cut out your servo holes as well.
Using the plans to guide you, utilize 5-minute epoxy to glue the spacers to the two sides. Fold the forward sections inward forming the nose, and glue together. The trailing ends of the fuselage sides can now be carefully drawn together and glued. To make a nicer fit, remove a little foam from the front and rear before gluing the sides together.
Now would be a good time to construct the top cover of the fuselage using 3 mm Depron. Simply invert the partially completed fuselage and trace it onto the Depron. Cut out the three foam pieces. Glue the forward and aft sections in place and trim as required. Note that the large, flat top piece is all hatch and is not glued at all. Simply test-fit the latch and likewise trim as required.
When satisfied with the fit of the hatch, set it in place and hinge along its forward edge using a 1-inch strip of Blenderm. To reinforce the entire top of the radio compartment, I used a length of 2-inch wide clear packaging tape that I had on hand. Shipping tape would also work well. After trimming to fit, remember to make a widthwise cut to release the aft edge of the hatch.
To secure the rear of the hatch, I added a piece of 1/4-inch balsa, glued widthwise between the sides of my radio compartment and situated behind and flush with the bottom of the hatch. A single #0 x 1/4 panhead screw, pushed through the aft part of my foam hatch and screwed into the balsa, proved simple and effective.
Using 5-minute epoxy, glue the radio compartment onto the top of the wing. Piercing the skin of the Bluecor where the glue will be applied is again recommended. Remember to avoid those areas where the servos will be mounted flat against the wing.
Equipment installation: When the glue on the radio compartment is dry, you might as well install the two Hitec HS-55 (hitecrcd.com) or similar servos. Using the photos as a guide, notice how the servos are mounted as mirror images of each other. They are slid into place from the outside and epoxied flat to the wing.
Place a piece of Blenderm tape on the bottom of each servo before gluing. This not only prevents the glue from possibly getting into the servos, but also makes them removable. Install the servo horns in the vertical position and you are done.
I found that with a little careful trimming of the forward spacer, the 850 mAh 3S LiPo battery I chose fit perfectly. Adding a touch of Velcro held it securely in place. The Spektrum AR6100e receiver fit nicely right behind the battery between the servos, with my 30-amp ESC at the very rear. A little spacer trimming was again required.
Before the final equipment placement, drop the three ESC motor leads out the bottom of the radio compartment and connect them to the three EDF motor leads. I used 2 mm bullet connectors to match those that came on my EDF unit (hobbyking.com).
After gently pulling any slack back into the radio compartment, secure the wires snugly in place beneath the wing using two layers of Blenderm tape. This has proven to be a rugged, waterproof method that holds up well after many landings. Plug your servos and ESC into your receiver.

Here you can better see the compartment decking, hatch, and hinge detail.

The servos have been installed on the side of the radio compartment.
Control horns and pushrods: It’s time to install the two Du-Bro Micro2 control horns (dubro.com) on the top of each elevon. Place them where indicated on the plans using plenty of 5-minute epoxy. To avoid punching through the bottom of the elevons, remove roughly half the length of the two nylon anchor posts that protrude from underneath each control horn.
Using the plans to guide you, cut your two .060 carbon-fiber rods to the proper length. Next, cut two pieces of .032-inch music wire, each 2 inches long, and make an 1/8-inch “Z” in one end of each wire. Using 1-inch pieces of 1/8-inch heat-shrink tubing, secure the straight ends of the Z-bent wires to one end of each rod. As you heat the pieces of tubing, ensure that each wire protrudes 3/4 inch past the end of the rods. When all has cooled sufficiently, add a touch of CA glue where the wire exits the heat shrink tubing.
For your information, I learned a little trick when making Z-bends that makes attaching them to the control horns super simple. When making the final bend, angle the last section down, perpendicular to the pushrods. They can now be inserted and then simply rolled into and out of place as needed. Check out the photos for clarity.
After placing Du-Bro Mini E/Z Connectors into your servo arms, simply insert the end of your carbon-fiber pushrods. You might need to slightly enlarge the holes in the E/Z Connectors to accommodate the pushrods.
With the servo arms vertical, elevate the elevons approximately 1/18 inch up and then gently snug down the capture screws in the connectors. You might want to wait until after the system startup for final adjustments. This will ensure that your servos are centered when you adjust your servo arms and pushrods.
System startup: It’s time to install your flight battery and bind your receiver to your transmitter. When complete, go into your transmitter and choose the delta or similar setting. Depending on your radio system, you might need to make a few adjustments to get everything to properly function. Don’t hesitate to reverse functions and/or move servo leads to a different receiver port, if needed. Just remember to be patient and work through it.
When complete, gently advance your throttle to make sure your EDF is spinning in the proper direction. If it is not, simply reverse two of your ESC/EDF motor leads. Also remember to center your trims before making the final servo arm and pushrod adjustments.
The pushrod connection and the control horn connections.
The equipment placed inside of the radio compartment is visible.
Make it your own: Now you can decorate your Blue Dragonfly any way that you wish. I chose to use full sheet, clear labels purchased at my local Staples. I found free artwork on the internet and simply sized and printed it. After cutting out the images, I sprayed a light coat of clear matte finish to waterproof the ink on the artwork. Any brand will work but be sure to let it dry before applying the labels.
After you finish adorning your aircraft, check your CG. Your Blue Dragonfly should balance 71/2 inches back from the nose. You might need to shift your battery to achieve this. When satisfied, hey—you are done! It’s time to head to the flying field. Get ready for some real fun!
Off you go: After one final system check, it’s time to fly! To launch, grasp the right LE with your right hand and advance the throttle to full with your left hand. Facing into the wind, use a gentle “Frisbee-style” launch. With your ducted fan fully spooled up, it will practically fly out of your hand.
Apply a small amount of back pressure and your Blue Dragonfly will swiftly climb as it accelerates away from you. It might need a few clicks of trim, but it won’t need much. Your Blue Dragonfly will fly very predictably.
You will also find that it can fly well on partial throttle, so when it is at a comfortable height, save the battery and back it off. Now try a few maneuvers. It’s smooth and responsive and doesn’t have any bad habits.
When it’s time to land, pick a nice grassy area and chop the power. The Blue Dragonfly glides well and slows down without any tendency to tip stall.
Remember that cropped delta wing design? A few inches above the ground, gently flare and the airplane is down. Well done!
Final thoughts: Although the Blue Dragonfly is a master at “turn and burn” flying, relaxing slow flight is a breeze as well.
It’s inexpensive, super easy to build, and a joy to fly. You could have one in the air in just a few days. The fact that it’s a little different is also a plus. Encourage your friends to build one too.
The Blue Dragonfly would be perfect for RC Pylon Racing. Fly fast and exciting or slow and relaxing. Either way, fly safely and have fun.
This is your wingman signing off for now. Fun stuff.